You must have Perl version 5, and CGI.pm which comes with it.
You must have the SQL database to which you will interface installed.
You must have the DBI Perl module installed.
You must have the DBD Perl module installed for your SQL database.
You must have created a database name, a user, and a password.
The user should have all permissions granted for the intended database.
If you install "ImageMagick" and the "Image::Magick" module
(optional)
you can create thumbnails of uploaded images for faster display.
If you install the Mail::Bulkmail and MIME::Lite modules (optional)
you can send messages to many people quickly.
Installation
Read the license agreement
first. By proceeding with installation you are agreeing to the terms of
the license agreement.
Create an "uploads" directory with 777 permissions (browsable
under the html pages, not in cgi-bin)
Upload the "_images" directory with all of its contents into the
uploads directory, so that "_images" is a sub directory of "uploads".
If you do not already have a database created in your SQL
program for the intended project, have your database administrator
create one and assign FULL privileges to your username.
Open the webdata_pro.pl script and add your database
name, SQL username, SQL password, webdata admin password, the path
and URL to "uploads", and the URL of the script in the designated
places
near the top. These lines are well commented. Unlike Webdata 2.x,
the path to "uploads" does not end with a slash.
Put "webdata_pro.pl" in the cgi-bin and chmod 755 the file.
Put "wdpro.pm" in the cgi-bin and chmod 755 the file.
Browse to the webdata_pro.pl script, and enter "admin" where it
asks for an e-mail address. Enter the administration password in the
password box.
Introduction
See Getting Started
for a quick guide to setting up your first database.
Webdata Pro is a full featured web database design
application. It contains everything you need to create a searchable
online database. Unlike PHP and ASP, Webdata Pro is much more
than simply an interface requiring you to build your own html pages
embedded with SQL tags.
Webdata Pro is a complete user friendly solution. It can create search
pages, reports, and forms on the fly, allowing you to customize them
in a variety of ways to match the look of your site. The members
feature
is pre-built, allowing you to instantly assign passwords and privileges
to your users. The relationship manager is also a big time saver.
Not only does it create pop-up lists with values from the related
table,
but you can select fields from many different tables when designing
your
reports without ever thinking about the relational SQL join syntax.
To users of Webdata 2.x. We appreciate your
continued trust in Webteacher Software to manage your online
databases. Webdata Pro has many similarities to Webdata
2.x. The "layout" screen looks very much like the "customize
pages" screen in Webdata
2.x, with boxes for pasting HTML into the headers, footers, and
templates
to create a customized look and feel. Pictures and files are
still added to the database by defining an "upload" field and then
using the browse button on the submit form, and members can still
modify only
their own data. Much of your Webdata 2.x database can be automatically imported into
Webdata Pro. Here are some of the things that have changed: Relational capabilities: See Introduction to relational
databasing and Table
Relationships for details. Greater Maximum size:Databases such as MySQL are
capable of handling hundreds of times more data than the "flat
text file" method used by Webdata 2.x. Member Profiles: Each member can specify their contact
information, homepage, and up to 10 administrator specified fields.
This information can be automatically included in the search pages,
forms and reports. Member Privileges: Each member can be assigned very specific
privileges about adding, modifying, deleting, and searching.
Groups can be created to assign the same privileges to several members
at once. Password Mailing: If a member forgets their password, it can
be automatically e-mailed to them. Multiple : Each layout includes a search page, report
page, and form view. Different layouts can be used to search different
collections of fields, and you can restrict which layouts are available
to various members or the public. This gives you unlimited
versatility in managing the display of your database.
Planning Your Database:
If you are an experienced database administrator you can
probably skip this part. The first stage in database development
is planning, especially when using a relational database. If you
do not have any experience with relational databases, you should read
the "Intro to relational
database" section first. You need to consider your field
list: what criteria will people use to search, and what information
will they want to see? Look at each field, and ask whether it
should be broken apart into separate fields so that you can search,
sort, or display just one part of it. For example, it might be
fine to have a Name field containing a
person's entire name, unless you will need to sort by Last Name,
or display the Last Name first, in which case you should create
a First Name and a Last Name field. Also,
consider
whether the passage of time could render your data obsolete.
Don't
create an Age field, create Date of Birth. The
same
principal goes for Years With Company vs. Start Date,
etc.
You will need to think about the field types as well. You
will
be required to select whether a field is used for text, numbers, or
dates.
It is important to define a numeric field properly if you will need to
sort
it, so that 51 is less than 229, and to perform numeric searches such
as
"price > 200". On the other hand, phone numbers should be
entered
as text so that you can include ( ) - characters, and zip codes
could
contain either numbers or a mixture, depending on the Country.
Table Relationship Design:
At this point you have read our "Intro to relational
databases" which explains the principle mechanics of joining
tables, but not right and wrong way to decide which tables will be
joined and how. We used an
example of a large list of products which came from the same small list
of vendors. It is important that we put the vendors into a
separate
table, rather than including the vendor's name and contact information
in
one big table. Creating one big "flat file", as such
databases
are called, has several disadvantages. It runs more slowly
because
it has more data, it is cumbersome to update when a vendor's
information
changes (whereas in our relational model you only need to make the
change
once), and data entry will take longer and be more prone to
errors.
Therefore, it is highly recommended that you break your database apart
into
as many smaller tables as possible. How do you know when a
collection
of fields belongs in a separate table? If the value in one field
directs
the value for another field, you should create a separate table for
those
fields. For example, let's say we created an employees table like
this:
"First Name, Last Name, Extension, Department,
Manager, Job Title"
Once you know an employee's department, if that means you must
know
who their manager is, you would want to create a separate table named
"departments", even if Department Name and Manager
are the only fields in it.
Another thing to watch out for is repetitious fields. You
would not want to create a CD database like this:
No matter how many songs you create, there is always the
possibility that someday you will need one more, and your user will not
want to go redefining the table structure just to enter a new CD into
the database. Also, searching for a given song is cumbersome in
this design because you do not know which field to search.
Instead, you would create a table named "Songs" which contains each
song's Song Title, Artist, and CD ID. Now you
have the added flexibility of
being able to associate a different Artist with each song. Later
on, when you are asked to add "running time" of each song into
the database, you can just add a field into the "Songs" table.
Any time that you find yourself numbering fields because they contain
different instances of the same thing you should probably create a
separate
table for them. This design works much better:
Songs
Song Title
Artist CD
Running Time CD ID <1-----M> CD ID CD Title Record Label
Getting Started
Setting up the database: This is our recommended
sequence for building a database in Webdata. To Log In: Browse to the script URL, it will generate a login
page. Enter "admin" in the e-mail box, and your password in the
password box.
Step 1: Create the tables. Now that you have planned your
tables, it is a simple matter to enter them into Webdata. Simply click
"Manage Table Configurations" on the Administration screen, and begin
creating your tables. See "Creating
Tables" for more information. Step 2: Define the relationships. Once each of your tables are
built, you should click the "Define Relationships" button and enter
your one-to-many relationships into Webdata, always putting the Many
side on the LEFT. See "Defining
Relationships" for more information. Step 3. Enter some data. The next step is to
go to the "Data Entry" screen for each
table and add a few sample records. Step 4. Set up the default Layout. When you go to the "Manage Layouts" page, select the default
layout and click "Edit Selected Layout". Choose which fields will
appear on the search page, which fields should appear in the results
table,
whether you want a "form view button" for more details about each
record,
set the number of results per page, and check the "show 'next
page/previous page'", "show 'Go to page 123'", "show 'search again'", "
and "show
'return to home page'" boxes. Next, click "Save Layout", wait for
the screen to refresh, and click "Go to user search page".
Congratulations, you now have a searchable web database. If your
needs are not fancy you can stop right here. Do a few practice
searches, and then return to the Default Layout page and explore more
of the options. Step 5.Create a link on your
new-homepage-under-construction which calls the script followed by: ?_cgifunction=user
For example: <A
HREF="/cgi-bin/webdata_pro.pl?_cgifunction=user"> Search the
database </A>
(Later, when you have created other
layouts, you can add &_layout=LayoutName to the URL to call different search pages which lead
to different reports) See "Search Pages" for
more information.. Step 6. Create members to add records.
If someone besides yourself needs to enter data into the tables, click "Manage Members" from the administration page
and click "Add New Member". Enter at least an e-mail address and
password for the member, and check the "Add" box at the bottom for each
table to which the member may add records. Also select the
default
layout so that this person can search. Now return to the login
page
and log in as the new member. You will be able to customize this
page
later. If there are more people that will be able to add records,
you will select THIS member in their "Group" box so that you do not
have to enter the the same privileges again. Step 7. Create members to Search. If you
want to make some information available only to members, first reset
the default layout so that it does not contain the privileged
fields. Then create a new layout which does contain those
fields, being sure that "allow visitors to search" is not
checked. Now, create a member and select the name of the new
layout in his/her profile. Create other members that may search,
and group them to that
member so that you do not need to enter the same privileges again.
Step 8. Customize, customize, customize.
There are more ways to customize Webdata than you can shake a stick at.
Login page: To create a
custom login page, simply browse to webdata_pro.pl so that the default
login page comes up. Next, choose SAVE-AS from your browser's FILE
menu,
and save it to your hard disk as, for instance, "login.html". You
may now modify "login.html" to match the look and feel of your web site
and upload it to your server.
Search page: First, if you are
linking to the default layout for searches, you can customize the
search page either by entering custom HTML in the "search page header"
and "search page footer" boxes, or by choosing SAVE-AS while viewing
the default search page, editing a copy of it, and then entering the
URL to the
customized form in the box provided in the default layout page labeled
'URL for "search again" link'.
Search Results, Report: You may
customize the report by entering custom HTML in the header, sub-footer,
and
footer for search results. You can enter your own colors or background
into the BODY tag, select the number of results per page, and which
navigation controls you want. If you like using a table for the
results,
you can choose the colors of the table and enter font tag
parameters. If you choose to include a "form view" button to open
another window with details about the selected record, you may either
enter the label of the button, or replace it with the URL of your own
image. If you want even more customization, you can create a
template by pasting the HTML for 1 record into the "template for search
results" box (it
will repeat for each record), and inserting $data[table.field] tags
where
the data will go, plus lots of other tags. See "templates" for more information.
Form view: To customize the form
view at all you have to use a template. The default layout is a
simple table with the values for every field in the searched table and
each related table. To customize it, simply make up an HTML page
in your
favorite editor, paste the source HTML into the form template box, and
then insert $data[table.field] tags where the data will go.
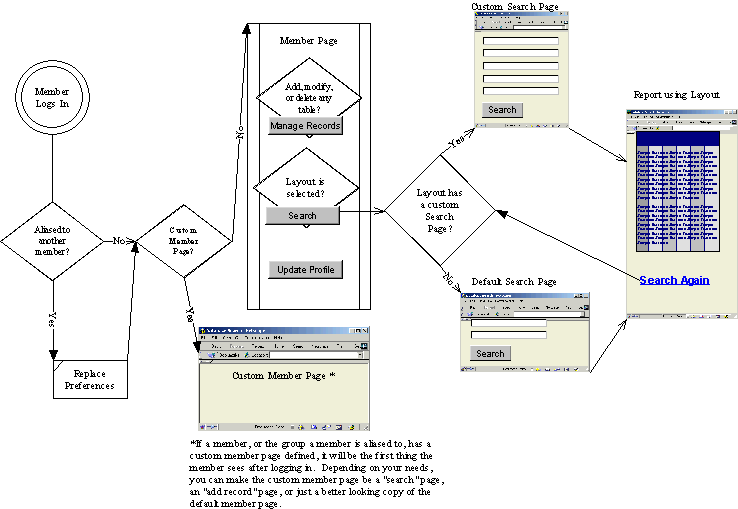
Members page: The member page
is the page the member sees immediately after logging in. You may
create as many member pages as you like. Each member (or member
group) could have a different one if needed. Simply log in as
a member, choose SAVE-AS on the default member page, customize a copy
of
it with your favorite HTML editor, and paste the URL of the custom
member
page in the box provided on each member's page. You could also
enter
a URL of a custom search page into this box to make that page come up
upon
logging in, or you could use the same SAVE-AS technique to make a
custom
copy of the "Data Entry" page for a given table, and enter that into
the
"Custom Member Page" box. Perhaps your custom member page will be
a nice looking collection of links to several custom search pages and
custom add pages. The possibilities are endless.
Creating Tables
From the administration screen, click on "Manage Table
Configurations". In this screen you can see the existing tables,
and you can either
build a table from scratch, or upload a delimited text file and have
Webdata convert it into a table. If you click "Build New Table",
Webdata will prompt you for the table name, and then it will take you
into the Field Manager for that table. Initially the table will have
only
one field, the name you chose followed by "_id". This field will
be
defined as the primary key. If you have another field in mind for
the
primary key, you can change the key and delete the [tablename]_id field
after
you have finished defining your fields. Note: If the table name
ends
with the letter 's', Webdata will drop the last letter of the table
when
defining the ID field, so that a table named "Employees" will have a
key
field of "employee_id". You may rename a field any time if this
results
in an improper field name.
See "Defining Fields" below for
instructions on creating the fields for your new table.
Deleting Tables - If you want
to delete a table, click the "Drop this entire table" button at the
bottom of the table's field manager. Renaming a Table - There is a
"Rename Table" button at the bottom of the table's field manager.
Please note that we are still working on the resursive routines which
should follow a table renaming. As of Version 1.52, you will still need
to update the layouts and relationships to replace any occurences of
the old table name.
Uploading New Tables
There are two ways to upload your delimited text files into
Webdata. If the table has already been created, and the fields in
your table match the fields in your delimited text file, you can use
the "import" button, located on the "Manage Records" page. Click here for details. If the table
has not been created yet, and your delimited text file contains the
field names in the first row, Webdata can build the table
automatically. At the bottom of the "Manage Table Configurations"
screen, use the browse button to select your text file. Then
choose "comma", "tab", or
"pipe" from the delimiter list, and click "Upload Table". A
prompt
box will ask you what you want to name the new table. Webdata
will
analyze your data and select field types such as "text", "int",
"float",
and "date". It will also create a primary key field named "ID"
or "ID_1" which will contain an auto counter. If your table
already
has a primary key, you can simply reassign the primary key and then
delete
the "ID" field. All of the fields will be text boxes of various
sizes until you use the Field Manager to
redefine them.
Upgrading from Webdata 2.x
At the bottom of the "Manage Table Configurations" screen
there is a link labeled "Upgrade from Webdata 2.x". When the link
is clicked, a prompt box will ask for the filename of the Webdata
database from which you are upgrading. If you are running Webdata
Pro
in the same cgi-bin as your old Webdata database, simply enter the
filename of the script, for example "webdata_dbname.pl". Webdata
Pro will open the specified file, locate the log files, and build a new
table named "dbname" (or whatever your database is named) with all of
the same field preferences. It will also copy many of your report
preferences
to a new layout named "dbname". The new layout form and the old
"customize pages" screen are not identical, and there may still be some
fine-tuning to do, but this will alleviate 90% of the work.
If you are running Webdata Pro in a different folder or on a
different server from your Webdata 2.x database, you can still use this
utility to import your old database. Simply import the 4 *.log
files from the cgi-bin of your Webdata 2.x database into the cgi-bin
where Webdata Pro now resides. Then, in the prompt box, enter an
exclamation point followed by just the NAME portion of your
database. In our example, if the log files are named
"dbname_data.log", "dbname_fields.log", "dbname_report.log" and
"dbname_members.log", you would type: "!dbname" into the prompt
box.
Members cannot be imported. Webdata 2.x uses a one-way
encryption for the member passwords, which means that there is no way
to import them into the new format. The instructions above will
work just as well with only the "dbname_data.log", "dbname_fields.log",
and "dbname_report.log" files.
Defining Fields
You can enter the Field Manager for a given table one of 3
ways. First, if you click "Manage Table Configurations" from the
administration screen you will enter the "Manage Tables" page. Clicking
on the name of any table will bring you into the Field Manager for that
table. Second, when managing records in any given table, there is
a link at the bottom titled "Edit fields for [table name] table" which
will bring you into the Field Manager. Third, when you click
"Build New Table" in the "Manage Tables" screen you will be forwarded
to the new table in Field Manager view.
Note: You should always put the most important and
descriptive fields first when setting up your tables in Webdata.
There are
two reasons for this. First, when using the "search/modify"
button
on the "Manage Records" screen, the table will show only the first 8
fields in the database. Second, if a table is on the "one" side of a
"one to
many" relationship, the table's primary key will appear in a select
list
when adding or modifying records to the related table. The list will
contain the primary key followed by the first 3 fields in the database.
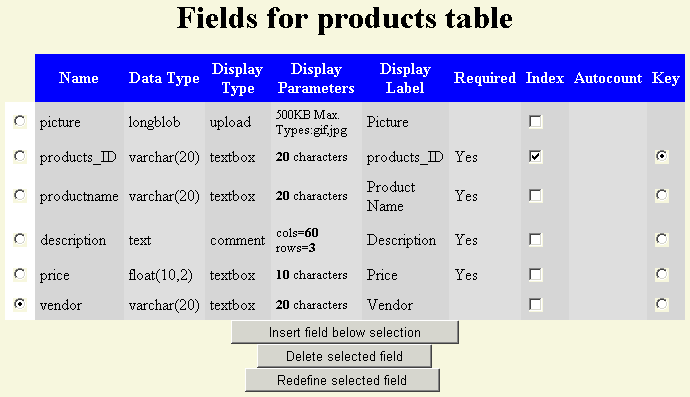
Here is a screenshot of a typical table.
Name is the field's name in the SQL database. For
consistency and stability, Webdata defines field names in lowercase
with no spaces. Data Type is the SQL database's data type, such as
text, date, or int. Display Type is the type of input box which will appear on the
add and search forms. It can be a textbox, a checkbox, a select
list, a textarea (comment) box, or a file box for uploading images. Display Parameters contains information about the display
type. For example, if the display type is "textbox", the parameters
will contain the size. If it is a select list, the parameters
will
contain the option values or you will be able to select a table and
field
which contains the option values. Checkboxes have no parameters.
A textarea box will prompt you for the number of characters wide and
rows high the box should be. An upload field will prompt you for
the maximum number of Kilobytes and permissible file extensions to be
uploaded. Display Label is the text which appears next to each
box. It may contain spaces, caps, or even symbol characters
because it is not used in the SQL statements. Required is self explanatory. When this is selected you the
database will not let you leave this field blank. Index
is checked if the database has indexed that field. You can add or
drop indexes by checking this box. Wait a moment after checking
or unchecking an index box as the page will need to refresh.
Indexes are discussed in more detail under "Defining Relationships". Comment
fields
will automatically use FULLTEXT indexes, indicated by the letter "F"
next to the checked box. See "FULLTEXT indexes" under "Search Logic" for more details. Autocount
will display the word "Yes" if a field is set to have an auto
counter. In this case, the field should be left blank when adding
new records, and the database will automatically insert a sequential
number. Key, in the current version, each table may have
only 1 primary key. You may change the primary key by clicking a
radio button in this column.
Wait a moment after selecting a new Key for the page to refresh.
The primary key is discussed in more detail under "Defining Relationships".
To create a new field: First, use the column of radio
buttons on the left edge of the table to select the field which is just
above where you would like to create your new field.
Then click "Insert field below selection" to start the "define field"
wizard. By
default the last field is selected and the "Insert field below
selection
" button is focused, so that you can add several fields rapidly by
pressing
'Enter' each time the page refreshes. If you want to insert a
field at the top of the list, you must first clear the column of all
selections. To do this, click the " Click here to reset the
form." link at the bottom of the page, then click "Insert field below
selection". See "Defining a field" in this section for a
description of the "define field wizard."
To delete a field: Use the column of radio buttons on the
left edge of the table to select the field which you would like to
delete. Then click the button labeled "Delete selected field". A
JavaScript box will ask you to confirm that you want to delete that
field. All data in that field will be destroyed. If the field is
an upload field, all images or files associated with that field will be
destroyed.
To redefine a field: You may change the name, data type,
display type, display parameters, display label, requirements, or auto
count status of a field by selecting the radio button on the left edge
of
the table for the desired field and then clicking "Redefine selected
field." See "Defining a field" below in this section for a
description of the
"define field wizard" which will appear.
Defining a field: Both "Insert field below selection" and
"Redefine selected field" will launch the "define field" wizard. The
wizard
is a series of JavaScript prompts which ask you questions about the
type
of data which will be saved in the field. The first box asks you
to choose a name. Enter the Display Name, as you want it
to
appear on your forms and reports. Next you are asked whether the
display should be a textbox, checkbox, list, comment (textarea), or
Upload. Enter only the NUMBERwhich appears next
to the desired option. From there, the questions vary depending
on your choice. Whenever the options are numbered, enter only the
NUMBER of the desired
option. The wizard may end by asking if this field is required
(enter
'Yes' or 'No') and if this field should have an auto counter (enter
'Yes'
or 'No'). When there are no more prompts, wait for the page to
refresh
before continuing.
Drop this entire table: If you click this button, and
click "OK" when the JavaScript confirm box appears, the entire table
and all
of its contents will be removed from the database.
Here is a quick example that explains what relational databasing
is:
Imagine that you have a database of 15,000 products which you sell
in your
store. Each of these products is ordered from one of 11 different
vendors that
you work with. You wish to display each product, with the name and
address
of its vendor. It would be a waste of space to repeat the vendor's name
and
address over and over again in the products table. Instead,
the smart solution
is to create another small table named "vendors", which contains only
11
records, one for each vendor, with each vendor's address. Then, as long
as
you have a vendor name in the products table for each record, the
database
can actually look up the vendor information as it displays each
product. It is
this process of looking up information from another table that has come
to
be known as Relational Databasing.
Products Table: --------------- SKU_Code Name Description
Vendors Table: Price
-------------- Vendor <M-------------------1> Vendor_Name
Address
City
State/Province
Postal Code
Telephone
Fax
Now, when we query the database for a product named "small
widget",
the
database will locate the record in Products which contains "small
widget" in
the Name field. It will display the SKU_Code, Name, Description, and
Price.
It will then automatically find the record in Vendors which
contains the same
value in "Vendor_Name" as the Products table has stored in the "Vendor"
field, and it will display the Vendor Name, Address, City, etc.
Sometimes students will ask "Doesn't this slow the database down
because it
has to do all of these additional lookups?" The answer is "No. Actually
the
database goes faster because it has to load less data into memory." In
fact,
databases preload a list of Vendor Names so that they can locate the
correct
record without searching. This list is called an index.
Primary Keys
What would happen if we had two vendors with the same name?
For
example, if some products are ordered from "American Widgets" out of
the
Seattle, WA office, and others come from another branch of "American
Widgets" located in Boston, MA. When a product tried to lookup the
vendor
information for "American Widgets", it would not know which
record to load.
Because of this, there is a rule that the field which is used for
looking up
values from other tables must be unique. This field has a special name.
It is
called the Primary Key.. If we had defined "Vendor_Name" as
the primary
key, the database would never have allowed us to enter a second record
with
the same vendor name as an existing record. We would have been forced
to
choose an alternative, such as "American Widgets - Boston",
and the problem
would be resolved. The database also makes sure that the Primary Key
field
is never left blank, and it will create an index so that the lookups
are as fast as
possible.
1 to 1, 1 to Many
There are 2 types of table relationships, "1 to 1", and "1 to Many".
The most
common type of table relationship is called a "1 to Many" relationship.
Using
our example above, each vendor name will appear only once in the
Vendors
table, but it could appear many times in the Products table. In the
diagram
above, a "1" and an "M" were placed at the appropriate ends
of the
relationship line.
1 to 1 relationships are used to break one big table into 2
smaller
tables. You
may wish to do this because some of the data is not used much of the
time,
and you want to speed up the database for the remaining data. Also, in
some
programs, you may be able to restrict access to the second table for
security
reasons.
Combo Boxes - lists of possible values while adding or
modifying
records. If you have defined a 1 to Many relationship between two
tables,
when you go to add a new record to the table on the "Many" side,
Webdata
will automatically insert a select list with all of the possible values
for the
foreign key, the field that is used to look up a value from
the other table. This
is very helpful because it means you do not have to worry about
entering the
related values correctly. Note: When defining the fields for a table
which will
be on the "one side" of a relationship, put the most important and
descriptive
fields first. The first 3 field values will appear next to the primary
key in the
select list. That way, if the primary key is a social security number,
you can
have the person's name appear next to each number in the list.
2. Webdata's
Relationship Screen
In the Webdata "Table Relationships" screen, each relationship is
displayed as
a pair of select lists.
IMPORTANT, in a "1 to Many" relationship, The Many table always
goes on the left. Our example above would be displayed like
this:
more than 1 relationship:
If you wish to create more that 1 relationship, simply select your
first table
relationship using the 2 boxes on the screen, labeled "** Select a
field **",
then click "Save Table Relationships". When the screen refreshes, it
will
display your selections, and then create 2 more "** Select a field **"
boxes
for your next table relationship.
Deleting a relationship:
To delete a relationship, select the first option (** Delete
Relationship **) in
either column, and then click "Save Table Relationships".
Adding Records
Records are added, modified, and deleted from the "Data
Entry" screen. From the administration screen if you click "Manage
Records" you will be taken to a list of each table in the
database. After you select a table and click "Go to selected
table" you will come to
the Data Entry screen for that table. Users of Webdata 2.x will
notice that the Data Entry screen is identical to the administration
screen
from that version. Members that have privileges to add, modify,
or delete records in one or more tables will see a "Manage Records"
button
on their main Members Page. Also, when managing the fields for
any table there is a link at the bottom to go to the Data Entry page
for
the same table.
To add a record, simply enter the desired data into the field
boxes
and click "Add". You may leave boxes labeled (Auto Fill)
blank.
If the field is a date, the proper format (mm/dd/yy) or (dd/mm/yy) will
appear. 2 digit years less than 20 are assumed to be Y2K, but you
can always enter a 4 digit year to be sure. You may also omit the
year and Webdata will assume the current year.
Allowing visitors to add records without logging in.
Every record in Webdata Pro must have an owner, but that does not mean
that you need to force users to complete the member registration page
just to get them to sign your guestbook or rate a product.
To allow anonymous submissions to a table, first, create a guest
membership account, for example:
email="guest", password="guest", firstname="guest", lastname="guest".
Next, check the box allowing "guest" to add records to the desired
table.
Log in as "guest" and select the desired table.
Choose SAVE-AS from the FILE menu in your browser. Save the
blank table form to your hard drive as "guestsubmit.html", for example.
Open "guestsubmit.html" in your favorite html editor. You may now
modify the look of the page to match your web site.
Just before the </FORM> tag, insert the following:
<INPUT TYPE=HIDDEN NAME="username" VALUE="guest">
<INPUT TYPE=HIDDEN NAME="password" VALUE="guest">
Finally, upload "guestsubmit.html" to any directory on your
server and create links to it as needed.
Adding records to two or more related tables at the same time. Webdata Pro can handle adding records into two or more related
tables from a single form. All you have
to do is include the desired "table.field" input boxes for both tables,
and include all of the
table names in the "_tableName" field, seperated by a comma. For
example, lets say you have
a database of realtors and realty offices.
Make sure you've set up the relationships screen to reflect the
join between these two tables.
Now, if a realty office doesn't exist, you want to make it easy for a
realtor to enter themselves and their office all at once, rather than
forcing them to "add an office" and then "add a realtor" while
selecting the office that they just added from a list. If you
copy the "Manage Data" page for both tables into one form and remove
the headers and footers you might get a form that looks like this:
Realtors
owner (use for searching only)
timestamp (use for searching
only) realtor_id (use for searching
only) name photo phone office
Offices
owner (use for searching only)
timestamp (use for searching
only) office_id (use for searching
only) name address
Next remove all of the boxes with "use for searching only) next to
them, and clean up the form until it looks something like this:
Finally, you need to modify the hidden _tableName tag so
that it
contains both table names like so:
<INPUT TYPE=HIDDEN NAME="_tableName" VALUE="office, realtor">
Webdata Pro will determine that "office" is on the 1-side of the
relationship. It will submit
the values to the office table first. Since office_id is an auto-count
field and no value was submitted, a unique
number will automatically inserted into the office_id field. Webdata
Pro will then retrieve that number and use
it as the value of "realtor.office" when submitting the values to the
"realtor" table.
Importing Text Files
Importing to an existing table: At the bottom of
the Data Entry screen (see "Adding Records"
above) admin will see a link titled "Import Records". This takes
you to the Import screen, from which you may use the Browse button to
select a delimited text file, choose whether the file is comma, tab, or
pipe
delimited, and import. The delimited text file must be in the
same
sequence as the fields in Webdata. We recommend using Excel or
Lotus
to change the column sequence until the field sequences match.
Skip First Column: When you define a new table or import
an existing table, Webdata Pro automatically creates an autocounter
field named "table_ID" as the first field.
In some cases you will delete that field because you already have
a primary key field in that table. Other times you will choose to leave
it there. When you go to import more data into that table, the
columns in your source file must match the fields in Webdata exactly
(not including the hidden _owner and _timestamp fields). You can
either insert a
blank column to the left of your data to hold a place for the table_ID
field, or simply check this box to skip that field.
You can easily export some or all of any table to a comma,
tab, or pipe delimited text file. Simply browse to the "Manage
Records" page for the desired table, and click "search/modify". You may
enter some criteria in the boxes first to restrict the search, or leave
the form blank to display all of the records in the table. Once
the
first page of records appears, scroll to the bottom of the screen and
locate
the "Export" button. Choose your delimiter from the list and
click
"Export". The page which follows is in plain text format, no HTML
is used. Select SAVE-AS from the file menu, and change the name (which
will
be the script name by default) to something appropriate such as
"export.txt".
If you choose "comma" as your delimiter, use ".csv" as the file
extension. It will make it easier to import into some programs.
Exporting to Microsoft Excel If you choose "MS Excel" from the delimiter list and Excel is
installed on your machine the results will open in Excel.
Modifying Records
To modify a record, start at the Data Entry page for the
desired table (see "Adding Records").
Search for the record by entering criteria into any field and clicking
"Search/modify". See "Search Logic"
for a technical discussion of the search syntax available from this
screen. You may also leave the box blank to show a list of all
records in the table. When the results appear, click anywhere on
the selected record, and a
new window, the "Maintenance Page" will open with that record's data in
field boxes. You may sort the search results screen by clicking
on the column labels. Make your changes in the boxes, and click
"Modify".
The window will close (unless debug is on)
and
the search results page will refresh to show the modified data.
If your change is not allowed (for instance, if you entered a duplicate
value in a primary key field) you will get an error with a message from
the SQL database software explaining the reason your modification was
not
accepted.
If you would like to customize the Maintenance Page for certain
members, either to give the page a more customized look, or to hide
certain
fields from access, there is a template on
the members page next to each table.
Replacing Values
You can effectively perform a Search-and-replace in
Webdata.
First, click "Manage Records" and select the desired table.
Next, search for only the records in which you will replace
a field value. At the bottom of the screen there is an option
to choose which field will contain the new value, and a box in which
you may enter the new value.
To enter a text value in the selected field, put a quotation mark
before and after the text. Entering: "red"
into the box will put the word red into the selected
field for each found record.
To enter a calculation, type the fieldname without quotes, for
example, I could increase the price of
every item by 10% by selecting the price field, and entering: price=price*1.1
You may also use the wide array of Math, Date, and String
functions
built into MySQL. For example, to use the LEFT() function to remove all
but
the first 5 characters of the zipcode field, I would enter: LEFT(zipcode,4)
See the MySQL manual for a complete list of functions.
Technical Note: The contents of the textbox is transferred
directly to a MySQL UPDATE statement like so:
UPDATE table SET selected-fieldname = textbox-value WHERE
search-performed-earlier
The easiest way to delete a record is to use the
"Search/modify" button from the Data Entry page (see "Adding Records"). Each found record
will have a checkbox on its
left with the word "Delete" at the top of the column. Simply
select
the record or records which you wish to delete, and then click "Delete
Only Selected Records" at the bottom of the page. If you need to
delete a large number of records which all conform to a certain
criteria
you may enter that criteria into the Data Entry form, click
"Search/modify", and then click "Delete All ## Found Records" at the
bottom of the page (where ## is the number of found records). For
example, If I wished to expunge all records where the "Date of Sale" is
less than 1/1/2000, I would type: <1/1/2000 into
the "Date of Sale" box, click "Search/modify", and then click "Delete
All ## Found Records".
Multi-line Text Data
When text is added into a comment field, the text wrapping
feature is set to "soft", which means that, although the text will
appear to wrap in the box, no newline (AKA Carriage Return) character
is being saved unless the user expressly pressed the "Enter" key, or
pastes text into the box which contains a newline character.
When the data is displayed, Webdata automatically replaces all
newline characters with a <BR> tag. This enables the
program to preserve the original formatting so that the line breaks
entered by
the user are shown in the search results.
If you do not want Webdata to substitute newlines with <BR>
tags, the data must begin with "<HTML>". The presence of the
<HTML> tag at the start of the data will disable <BR>
substitution. This is particularly useful to webmasters that wish
to embed JavaScript commands, or other syntax where line breaks are
important but are not to be displayed. The field does not
actually need to contain HTML formatted text in order to use an opening
<HTML> tag as a signal to disable newline/<BR> substitution.
Uploading Images
Before you can upload an image, you need to define a field
as an upload field (see "Defining Fields").
When the "define field" wizard asks for the "Display Type", enter
the number corresponding with "Upload". For security reasons
you will enter a list of the file types that are permitted (usually
"gif,jpg")
and the maximum number of Kilobytes for an upload. Now, when you
go to the Data Entry screen for that table, the field will appear as a
textbox with a Browse button next to it. Simply click the Browse
button, select the image from your hard disk, fill in the rest of the
Data Entry form, and click "Add".
The image is placed in the "uploads" directory, which is
hard-coded
into the header of the script. The path includes
uploads/[tablename]/[keyValue]/[fieldname]/filename.ext. The
absolute URL to the image is saved in the database. When
Webdata displays the data, it will display the value within an
<IMG>
tag so the image will appear on-screen. If you have problems
uploading images, check that the "uploads" directory is properly
defined in the header of the script (both the server path and the URL),
and that the
"uploads" directory has 666 permissions.
You can create thumbnails on-the-fly if you have ImageMagick
installed on your server with the Image::Magick Perl module. On
the page, there is a box to enter the desired WIDTH of all
thumbnails. If there is a value in this box, every image uploaded
will have a corresponding thumbnail named "_tn_imagename" in the same
directory. When designing your templates, you can call the
thumbnail of the current image by
placing "$thumbnail[table.imageField]" in the page instead of
"$data[table.imageField]". By rendering a smaller copy of each
picture, your main report page
will load faster, and you can still create links to the full sized
image
using "$data[table.imageField]".
Backing-Up the Database
The "Back-up the database" link at the bottom of the
"Manage
Records" screen, will load a page with controls to backup and restore
the
entire MySQL database. This feature uses the "mysqldump" utility,
which
is a standard part of the MySQL installation. When you click
"Backup
Database", your screen will be filled with a long SQL script that will,
when
executed, rebuild and repopulate all of the tables in your
database.
We recommend leaving the "Include DROP TABLE" box checked so that the
restore
will be clean unless you have a specific reason for leaving the DROP
TABLE
commands out of your script.
The script will appear as plain text, not html, so you can simply
choose SAVE-AS from the FILE menu to save it to your hard disk.
Rather than use the Webdata script name, which will be the default,
you may name the file anything you choose.
To restore a database from a previously backed-up version, simply
select the backup file using the "Browse" button, and click "Restore
Database".
Troubleshooting: If you receive a "Could not find
mysqldump", the mysqldump program is not on the server, or is not
available to
the userid under which Webdata is running. Check with your system
administrator.
If the file is too large to upload through the browser, you can
upload it manually to your home directory. Then, from a telnet prompt,
type: cat [filename] | mysql [dbname] -u
[dbusername]
-p
where [filename] is the backup script, [dbname] is your database
name, and [dbusername] is your MySQL username.
Zip code Distance
Calculations
Webdata Pro has the ability to calculate the distance
between 2 US zip codes. To use this feature:
1. Locate the "add_zip_codes.sql" file which came bundled in the
webdata_pro.zip file.
2. Click "Manage Records", then click "Back-up the database", click
"Browse" and choose "add_zip_codes.sql".
3. Click "Restore Database". Click "OK" at the warning (this script
does not overwrite any tables other than _zipcode)
Be patient, the file is 2.7MB.
4. The easiest way to implement a distance search is to use
the Search by zip code distance
feature in a layout.
On the layout, there is an option below the search fields which
reads:
Search
by
zip code distance:
Allow users
to search by distance from the zip code in this
field: [LIST OF FIELDS]
The "Search by zip code distance" feature will insert the following
onto a search page:
Search by distance: Less than <INPUT TYPE=TEXT NAME="_zipDistance" SIZE=3
VALUE="20"> miles from <INPUT
TYPE=TEXT NAME="_homeZip" SIZE=5 MAXLENGTH=5>
If a zip code field has been chosen in the layout and there is any
value submitted for _homezip, Webdata Pro will
automatically attach the math equivalent of this to the query: WHERE (distance from _homeZip to zipField)
< _zipDistance
Shortcut for members: If the value of _homeZip is "member",
Webdata Pro will use the zip code from the member's profile as the
_homeZip value. You could easily embed this into a link on the
custom
member page like so:
<A
HREF="/cgi-bin/webdata_pro.pl?_cgifunction=search&_layout=businesses&_homeZip=member&_zipDistance=30">
Show businesses within 30
miles of your zip code.
</A>
Displaying distances: If you use templates, you may enter
"$distance" in either the search results template of the form view
template to
display the distance between the _homeZip value on the search page
and the value in the zip code field.
International Distances: Currently we only have the data
for
US zip codes. If you would like us to add data for another Country,
please
send us the data for each Postal Code with Longitude and Latitude. We
will
add options for Kilometers and multiple languages when we expand the
Zipcode
database to include other Countries.
Keeping the data current: The data included in the
webdata_pro.zip file was compiled by the US Census Beuro in 1999. It is
the most current source of free zip code coordinates available to date.
There are private organizations that are constantly updating their zip
code information and who offer their data for sale. If you would like
to use a 3rd party data source, simply strip it of every column except
for "zipcode", "latitude", and "longitude". Create a table named
"temp" with the following
3 fields:
zipcode (text, 5 chars, required), latitude (text 9 chars),
longitude (text 9 chars). Set "zipcode" as the primary key and
delete the "temp_id" field. Finally, use the "import" button on the
temp data page to import your file. Next, go to the SQL page and
type these commands:
DROP TABLE _zipcode;
DROP TABLE _temp;
ALTER TABLE temp RENAME AS _zipcode;
ALTER TABLE _zipcode DROP _owner;
ALTER TABLE _zipcode DROP _timestamp;
Layouts
A layout is a collection of preferences for a
search page, a report, and a form view. You may have as many
layouts as you like. Enter a layout by creating a link to
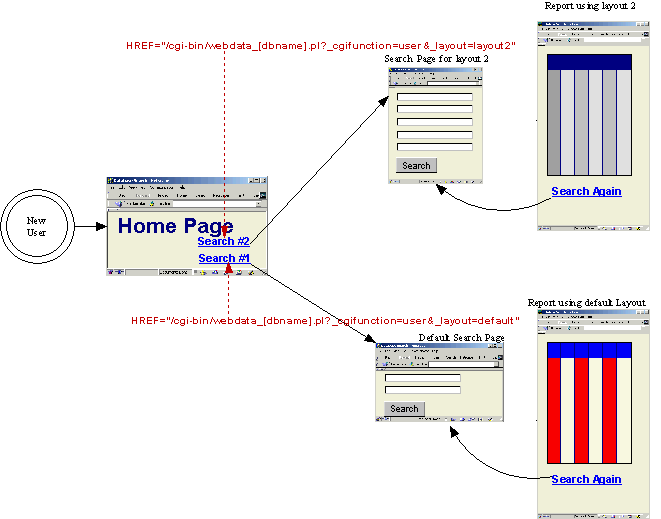
"?_cgifunction=user&_layout=layoutName" on your home page.
You may have different layouts for searching different collections of
tables, or perhaps the layout available to
the public will not show certain fields reserved for members. Here is
a screenshot of the layout screen.
Search Pages
Check "Allow visitors to search with this layout?"
if you would like this layout to be available to the general public.
If this box is unchecked, you may still make the layout available to
members through the Members page. The selected Language
will be used for the default instructions, and all buttons and links
the user will see on the search page, the report, and the form.
To create a search page in Webdata, first enter some header HTML
in the "Header for search page" box, such as your company's name
and logo. You may either type your own instructions into the
header box, or check "Include default instructions on search page"
and Webdata will insert the instructions just below the header.
Next you will choose "which fields to include on the search page".
Usually there are certain fields which the user will want to use for
searching, such as names and descriptions of the items in the table,
and there are other fields which a user would never search for.
Click "Clear Sequence" to be sure the right-hand box is clean, and then
click on each desired search field in the left-hand box in the sequence
you would like them to appear. If you make a mistake, click
"Clear Sequence" and start over.
Finally, enter any footer text, such as a copyright or navigation links
into the "Footer for search page" box. Check your work
by clicking the "Save Layout" button at the top, and then clicking "Go
to user search page" just below that button after the page refreshes.
To create a custom search
page follow the instructions above to have Webdata create a search
page and click "Go to user search page." Choose SAVE-AS from the
browser's FILE menu and save the page to your hard disk. Open the
page in your favorite HTML editor and customize it any way you like,
then
upload it to your server. Finally, enter the URL to your
customized
page into the box labeled "URL for "search again" link".
If
this box is not empty, the user will be forwarded to that URL whenever
they
choose to search this layout.
See Search Logic for a technical
discussion of the search syntax options.
Search Fields: If you do not choose to use a custom
search page,
you may select which fields will appear as search boxes on the search
page
using the 2 select lists under the heading: "Which fields should appear
on the search page?".
Use a single search box for entire record: If this box is
checked, the selected fields mentioned above will not appear. Instead,
a single box will be displayed. Search words entered into this
box will
return records which contain one of those words in any text
field.
In addition, the word "AND" is used to limit the results to records
which contain both words, and the word "NOT" is used to limit the
results to records which do not contain the word which follows it.
search words
return results where this is true for the entire record
red green blue
contains "red" or "green" or "blue"
red green and blue
(contains "red" or "green") AND (contains "blue")
red green and blue yellow
(contains "red" or "green") AND (contains "blue" or
"yellow")
not blue
does not contain "blue"
red green not blue
(contains "red" or "green") AND (does not contain "blue")
Search by zip code distance Allow users to search by distance from the
zip code in this field:
You must load the _zipcode table to use this feature. See Zip Code Distance Calculations.
If you select a field from this list which contains a US zip code,
Webdata will automatically
insert the following on the default search page for this layout:
Search by distance: Less than miles from this zip code
Of course, you may change the text any way you like if you create a custom search page.
Reports
General page layout using templates:
A report is a list of found records
which match the
user's
search criteria. In Webdata, you have a choice of either defining
a
table, or creating templates which use your own custom HTML. Here
is
a breakdown of the Report options
Parameters for BODY tag: Anything entered into this box
will be inserted in the BODY tag, after the word "BODY" and before the
closing ">". You can insert values for bgColor or Background to
change the background color or replace the background with an image.
You can also set values for "color", "link", and "vlink" to change the
text color. Furthermore, if you need to insert a special parameter such
as "onLoad='setTimeVal()'" you may do so here.
URL for "return to homepage" link: If you check the "Show
Return to Homepage" checkbox, further down on the page, a link will
appear at the bottom of every page labeled "Return to Homepage" in the
selected language. If this box is left empty, it will link to the
default search page, otherwise it will link to whatever URL is entered
in this box. It is best to enter full URLs into this box, beginning
with "http://".
Header for Search Results: Any HTML entered into this box
will be displayed at the top of the search results page. This is a good
place to put your company name, an image tag for your logo, and any
navigation buttons which are found throughout your site. You may enter
$count[table.field], $sum[table.field], or $avg[table.field] to display
summary data. For example, to show the sum of the "quantity"
field
in the "sales" table, you would simply enter: $sum[sales.quantity]
into the header where
you want the number to appear. The "Insert Field Assistant" located next
to the template boxes can help you create these tags.
Display Search Criteria: When this box is checked, the
parameters that the user searched for will be displayed just below the
Header
text. This is useful if your user will be displaying many complex
queries, and would like to document each one so they can tell them
apart when
reviewing printouts at a later time.
Hide Table Border: Simply a cosmetic choice. Webdata also
increases the cellpadding to make the table look better.
Font information: A FONT tag is inserted at the beginning
of every <TD> cell in the results table. Any text which you enter
in this box will be inserted into that FONT tag, after the word "FONT"
and before the closing ">". This allows you to change the font,
size, and color of the text inside the table.
Table Background Colors:: The Header Row is the
first row of the table. It contains the name of each field displayed. Alternate Row1 is the background color of all of
the odd numbered rows, while Alternate Row2 is the background
color of all of the even numbered rows. You may use the "Display Color
Table" button at the top of the page to get a list of the commonly used
colors, or you may enter a # sign followed by a 6 character hex code
for the desired color.
Sub-Footer for Search Results: The HTML entered into this
box will be displayed immediately after the search results. This is
especially useful if you wish to position the search results into your
own table. If you place a <TD> tag at the end of the "Header for
search results", you would place a </TD> tag at the top of the
"Sub-Footer for search results" box.
Number of Results Per Page If the number of found records
exceeds the number in this box, a "next page" button and "go to page 1
2 3
..." links will appear after the desired number of records is
displayed.
Show "go to page 1 2 3 ...": If the number of results per
page were set to 20, for example, and a query found 520 records,
Records 1-20 would appear on the first search results page, and Webdata
will
display:
If the user wished to skip directly records number 501-520, they could
click on the last numbered link, rather than clicking "next page" 26
times. If the number of pages is greater than 50, Webdata will scale
the numbering to avoid a cumbersome list of page numbers.
Show "Next Page/Previous Page" Buttons: Using the example
above, where records 1-20 of 520 are displayed on the first search
results page, the user could click "Next page" to display records
21-40, then click it again to display records 41-60, etc. Likewise, the
user can
go backwards by clicking the "Previous page" button. This box should
be checked unless you have an unusual situation such as withholding the
records on the other pages from non-members.
Note: You may define your own images to use instead of the default
buttons. See the text boxes titled "Next Page/Previous Page Buttons"
farther down on the layout form.
Show "Search Again" link: When this box is checked, a
link titled
"Search again" (in the selected language) will appear at the bottom of
each
page. The link will point to the default search page unless there is a
value
in the "URL for search again" box above.
Show "Return to Homepage" link: When this box is checked,
a link titled "Return to Homepage" (in the selected language) will
appear at the bottom of each page. The link will point to the default
homepage page unless there is a value in the "URL for Return to
Homepage" box above.
Bare-Bones mode: If you use the
$include tag or your own SSI tag to insert the results of a search
inside of another page, there are certain hidden parts of the page
which you may wish to surpress, for instance: The <HTML>,
<HEAD>, and <BODY> tags, the
JavaScript functions for changing pages, the "nav" form which is
embedded
in the bottom of the page, and the hidden table which is used to keep
the
"Next Page" and "Previous Page" buttons aligned. When NONE of the
following
boxes are checked, the above items are surpressed. "Show x-y of
z",
"Go to page 123...", " Show "Next Page/Previous Page" Buttons", " Show
'Search
Again' link", " Show 'Return to Homepage' link", " Include Form View
Button".
Footer for entire Search Results page: The HTML entered
into this box will appear at the very bottom of the page. If you would
like a footer navigation bar or a copyright to appear on every page,
this is the place to put it. You may enter $count[table.field],
$sum[table.field], or $avg[table.field] to display summary data.
For example, to show the sum of the "quantity" field in the "sales"
table, you would simply enter: $sum[sales.quantity]
into the footer where you want the number to appear. The "Insert Field Assistant" located next
to the template boxes can help you create these tags.
Sequence of Fields: If you do not use a template, Webdata
will show the found records in a table. These two boxes are used to
determine WHICH columns to display, and in what sequence. To select
your columns, first click "Clear Sequence", then click on each field in
the left box in the sequence you would like. We recommend you limit the
Report Columns list to 7 or 8 of the most important fields. Then, if
you check the "Include Form View Button" checkbox below, the user will
be able to click on
any record to see more information. If you select fields from 2 or more
different tables, Webdata will use the table relationships to build the
query accordingly. You should be aware of the table relationships when
selecting fields. For an explanation of the
"table._owner.firstname","table._owner.lastname" fields, see "Using Member Fields".
Sorting: Use these boxes to select the field you wish to
sort the results on, and whether to sort in ascending or descending
order. The second, third, and fourth sort boxes are only used if you
are likely to have several of the same value in the the first (or
second) sort field. For example, If I choose "State" in the first sort
box, "City" in the
second, and "Last Name" in the third, I am telling the database to
display
everyone from Alabama first, then everyone from Alaska, then Arkansas,
etc. When displaying the Alabama records, display those from Abbeville,
then Abernant, then Adamsville. Within each of those cities, display
the records in order of Last Name.
Random Sorting: You may choose "Random" from
the bottom of the list to display the column in a different random
sequence with
each new search. This feature requires that, in MySQL,
"ORDER BY RAND(n)" deliver unique results for each value of "n". We
found
that this only worked properly in MySQL 4.0 and above. If you get
the same random sequence each time, you may need to ask your system
administrator to upgrade.
Use Expanding Folders: When this box is checked the
results will be grouped into expandable and collapsable folder images,
also
known as a "cascading menu". Click the folders below to see a
demonstration.
MA
Boston
Area
123
Main St. | Brookline
45
Truckee | Allston
North
Shore
1
Miami Place | Glouster
129
Sycamore | Marblehead
8
Breezeway | Ipswich
NH
Central
1012
Hilltop Ave | Concord
13
Cassandra Pl | Laconia
Southern
33
Bulluryde Ct. | Manchester
8
Durham Rd. | Durham
881
Castonder Dr. | Nashua
For example, if I sort my contacts by "State" and then "ID" and
check this box, a yellow folder will appear on the left side of the
screen for each State represented in the search results. When the
user clicks on a folder, it will expand to show the contects in that
State, sorted by ID. Furthermore, if I choose to sort by State,
then Region, then City, then ID, I will get a second set of folders
when I expand a given State, one for each County, and when I expand a
given County I will get
a folder for each City. This will work in Netscape 6 and above,
and
Internet Explorer 4 and above. In older browsers, the results will
appear
as a fully expanded menu tree. The JavaScript code behind this
feature
was written by Dynamic Drive (http://www.dynamicdrive.com)
.
This feature works by placing the results in an Unordered List
(<UL> <LI> item1 </LI> <LI> item2
</LI> </UL)
If no text is entered in the "Template for Search Results" then the
sequence of fields defined above will be displayed between a
pair of <LI> </LI> tags, seperated by a pipe " | " .
If text is entered in the "Template for Search Results" then the
template will be displayed in between a pair of <LI> </LI>
tags. You may need to limit the contents of your template
accordingly.
If "Include Form View" (below) is checked, the page icon to the
left of each item will be a link to the form view for that record.
You will probably want to set the number of results per page
much
higher than you would for a table view. The "number of results"
box
can be set as high as 32767, but keep in mind that all of the results
will
be loaded into the browser when the page loads, even though they are
not
displayed until the folder is opened. Too long a list could take
a
long time over slow connections or possibly freeze the browser.
Reverse Table Join
By default Webdata Pro assumes the "many side" table is the primary
table, displaying all records from the "many side" with matches from
the "one side" when available. This checkbox reverses that logic.
An example of the
default setup: A dog pedigree database.
Thousands of dogs are in the "dogdirectory" table. When available, the
owner, kennel, and handler are added from other tables.
kennel.id <1---M> dogdirectory.kennel_id
The database assumes, correctly, that the dogdirectory is the primary
table and when fields from both of these tables are selected in the
same layout, that you will want to search all of the dogs, regardless
of whether the kennel information has been added. You could even
group the results by kennel, presenting it as a list of kennels with
dogs under each. The SQL statement will read: SELECT [fields] FROM dogdirectory LEFT OUTER JOIN kennel ON
dogdirectory.kennel_id=kennel.id
An example of reverse table setup:
What if you had some kennels in the database that had no dogs
associated with them? If you want to display a list of kennels
then you need to specify that the table on the ONE SIDE is now the
primary table. By checking this box, the database will display
every kennel, regardless of whether it has dogs, and will
include the dogs under each kennel. However, it will not display dogs
that do not have a kennel filled in.
The SQL statement will read: SELECT
[fields] FROM kennel LEFT
OUTER JOIN dogdirectory ON
dogdirectory.kennel_id=kennel.id
Form View Button: When this box is checked, a button or
an image
will appear to the left of every row in the results table. When the
user
clicks on this, a new window will open with more information about the
selected
record. If you do not use a template for form view, the database will
display
a list of every field in every related table and its current value. If
you
prefer the look of a button, enter a label such as "Details" or "More
Info"
into the "Label for Button" box, and leave the "Image file for Button"
blank.
If you would like to design a graphic to use here, simply upload it to
your
web server, and enter the full URL (begin with http://) into the "Image
file for Button" box.
Next
Page/Previous Page Button Images:
If you enter the URL of an image into one of these boxes, the image
will be displayed
instead of the default button.
URL when no results
are found: By default, the words "No results were found" appear on
the screen if a search comes up empty. If you would like to define a
custom page which will come up after an empty search, simply type its
URL into
this box.
Bulk Mail: Syntax: $bulkmail[table.field,"text
or image tag"] For example, if the "contacts.email" field
contains the e-mail address of every contact in the database. I could
put this in the header or footer for search results: $bulkmail[contacts.email,'<IMG
SRC=/images/bulkmail.jpg>']
My "bulkmail.jpg" button image would appear as a link. When the user
clicks on the link the program returns a "compose mail" page, with
boxes for FROM, SUBJECT, MESSAGE, and one ATTACHMENT. The FROM
value
will be filled in automatically if the user has logged in.
Additionally, Admin may send bulk mail to members using
a link at the bottom of the results of the member data search form.
Click "Manage Members", then click "Go to members table", then
optionally enter some
search criteria and click "Search/modify". Finally, click the "Bulk
Mail"
button at the bottom of the page.
You must have the Mail::Bulkmail and the MIME::Lite modules
installed to use this feature.
Webteacher Software recommends that you allow your members or
whomever may receive mail to select whether they wish to receive such
mail when
they sign up. Such a field could be hardcoded into the search form of
the
layout to which you attach the $bulkmail tag. If admin will be sending
mail to members, one of the "USER#" fields could be used to retain a
"Yes"
or "No" value for the e-mail preferences. Sending unsolicited
e-mail
has legal consequences, can place your server in jeopardy,
and is just not a nice thing to do.
Templates: A template is used to
display your own HTML designs instead of the default tables. By
inserting
certain keywords into your HTML, as described just above the "Template
for Search Results", you can integrate the data from each found record
into your designs. For example, the following HTML would display an
employee's name and phone number in a telephone directory format:
<B>$data[employees.lastname],
$data[employees.firstname]</B>............<I>$data[employees.telephone]</I><BR>
If there is any text in either of the template boxes, the template will
be used instead of the default table.
The "Template for Search Results" will be repeated once for each
found record. This means that if you set the number of results per page
to 15, the contents of the "Template for Search Results" will appear
15 times, each time with the values from a different records where the
$data[table.field] tags are. If you want your search results to appear
in a table, you should put the <TABLE>; tag in the "Header for
search results" and put the </TABLE> tag in the "Sub-footer for
search results". Then define a single row in the "Template for Search
Results", for example:
<TR><TD>$data[employees.lastname]</TD><TD>$data[employees.firstname]</TD></TR>
$if ( ) statements: You can
make any chunk of HTML appear only when certain values meet your
criteria. The syntax of the $if statement is as follows:
Here are
the operators that Webdata uses:
$if
(x) -- if no operator is present, Webdata returns true unless the
field is empty or equal to zero.
$if
(x < y) -- if x is less than y
$if
(x <= y) -- if x is less than or equal to y
$if
(x > y) -- if x is greater than y
$if
(x >= y) -- if x is greater than or equal to y
$if
(x==y) -- if x is equal to y
$if
(x =~ /y/) if text string x contains y (not case sensitive). If you
know regular expressions
you can use them inside the slashes for more complex text searches.
$if (! any expression above) if the expresson begins
with an exclamation point, the true and false results are reversed.
$if (criteria) {result if true} else {result if false}
For example: Display blinking text if price is under $10
$if ($data[products.price] <= 9.99) {<BLINK>Under Ten
Dollars</BLINK>}
Display a default image named "noPhoto.gif" if the
"picture" field
is empty.
$if ($data[people.picture]) {
<IMG SRC="$data[people.picture]">
} else {
<IMG SRC="/images/noPhoto.gif">
}
Display "Health Item" if the description contains the word
"organic" or "health".
$if (($data[food.description] =~ /organic/) or
($data[food.description] =~ /health/)) {
<B><font
color=red>Health Item</font></B>
}
$if(!$data[people.email]=~/^[\w.-]+\@(?:[\w-]+\.)+\w+$/) {
No valid e-mail address
}
You may have as many nested "and" and "or" conditions as you like. For
example:
$if (($data[employees.status=~/full time/) or
(($data[employees.status]=~/part time/) and (employees.hours > 30)))
{
Eligible for health coverage
}
One thing that Webdata cannot do is have $if() statements nested
inside of other $if() statements. See Calculations below
for
an explanation of creating more advanced conditionals in JavaScript.
$query statements:
You can embed your own queries into the header, footer,
sub-footer, group header, or templates.
This is important because it allows you to embed additional
information such as grouped tables and related values which are not
part of the main template.
The command $query[table.field, table.field WHERE conditional
clause] will return the selected fields which match your
critera as a SUBSET of the user's search. This means that
if the user entered "landscape" into a field named
"business.category", and you wrote the $query like this:
$query[business.name,
business.telephone WHERE business.preferred=1]
the $query statement would be replaced with a list of business names
and phone numbers where "preferred=1" AND "category contains
landscape".
You can also include group functions by adding the GROUP="table.field"
clause like this:
$query[business.category, count(*) WHERE
business.preferred=1 GROUP="business.category"]
The above $query tag would present a list of how many preferred
businesses are in each category.
Likewise, the sort order is specified with ORDER="table.field".
$query[business.category, count(*) WHERE
business.preferred=1 ORDER="business.category"]
The following parameters may be included to control the layout
of the table.
BORDER, LABELS, BGCOLOR, COLOR1, COLOR2, CELLPADDING, CELLSPACING
A value for BORDER is required to indicate that the results
should appear in a table, otherwise the $query tag will simply be
replaced with plain text. Each of these parameters must be
followed by an = sign, and the value must be contained in quotation
marks, for example:
$query[business.category,count(*) WHERE
business.preferred=1 GROUP="business.category"
LABELS="Category, # of Preferred
Businesses" BORDER="1"
BGCOLOR="WHITE" COLOR1="YELLOW"
COLOR2="WHITE"
CELLPADDING="10" CELLSPACING="0"]
Important: The quotations marks around each
value is
required.
SELECTALL="1" can be included in search templates and form
templates to force the query to perform a search of the entire database
regardless of the user's search criteria.
Other Examples: If, for instance, you wanted to
display the average age of the members in your database based on the
"table.birthdate" field, you would want to use the $query
function. Although Webdata Pro has a $AVG function, and a
$YEARSSINCE function, you need the power and flexibility of the native
SQL functions to achieve that goal. The function would be written:
<B>Average Age: </B>
$query[AVG(TO_DAYS(NOW())-TO_DAYS(table.birthdate))/365.25]
<B>Number of members under 21</B>
$query[count(*) WHERE
(TO_DAYS(NOW())-TO_DAYS(table.birthdate))/365.25 < 21]
A complete list of functions is available in the documentation
for your database platform.
Technical Notes: The phrase $query[ column
or functions list WHERE criteria ] is transposed into the
SELECT statement which the database used for the main search. The
list of tables and the JOIN criteria is handled automatically, and the
WHERE conditions specified in the $query statement is APPENDED to the
WHERE conditions specified by the user. For example, if the user
searched for people living in California, and the main results table
was based on this:
SELECT table.firstname,
table.lastname, table.telephone FROM table WHERE table.state='CA';
then the query example above for people under 21 would send
this statement to the database:
SELECT count(*)
FROM table
WHERE (table.state='CA')
AND
((TO_DAYS(NOW())-TO_DAYS(table.birthdate))/365.25 < 21);
If the SELECTALL parameter were used,
for example:
$query[count(*) WHERE (TO_DAYS(NOW())-TO_DAYS(table.birthdate))/365.25
< 21 SELECTALL="1"]
Then the original WHERE clause would be discarded, returning a
search of the entire database:
SELECT count(*)
FROM table
WHERE
((TO_DAYS(NOW())-TO_DAYS(table.birthdate))/365.25 < 21);
$hitcount: As long as you have
enabled the "search logs" option on the preferences
page, you can enter $hitcount in the Search Results template, the Form
template, and the Member's Maintenance template. It will be replaced
with the number of times that record has been viewed.
$select statements: $select[statement]where
"statement" is everything that would come AFTER the word SELECT in
an SQL statement.The $select statement is a simple way to get a value
or list of values from the database without the embedded criteria and
joins built into the $query statement. While $query is useful for
building nested tables pertaining to your search results, it can be
cumbersome
when all you want is the result of a simple SQL statement. You
can
use $select[count(*) FROM _members]
to display the number of members in the database, or type $select[max(amount) FROM sales] to return the
highest sale amount in the database.
The following parameters may be included to control the layout of the
table.
BORDER, LABELS, BGCOLOR, COLOR1, COLOR2, CELLPADDING, CELLSPACING
For example: $select[id,name,price FROM products BORDER="1"
LABELS="SKU,Name,Price" BGCOLOR="white" COLOR1="yellow"]
$escapeselect
statements: $escapeselect[statement] is the same as
$select (above) except that the results are escaped for use in HTTP
queries.
$modify and $delete:
The $modify and $delete tags are to be used only when you wish to allow
members to modify and delete records from the search results or form
view in a layout. This is designed to be an alternative
to
the default "Manage Data" view so that you may customize the look of
the
results page using layout templates while offering the members the
ability
to modify and delete. You may put a link to a layout with the
$modify
and $delete tags in it on a member's custom home page. You will almost
certainly want to check "Limit member searches to only their own
records?"
at the top of the layout so that you do not confuse members by offering
them search and delete options for records they do not own (the
permissions
will protect the data in any case), and make sure that this layout is
only selected in the profile of members that you wish to give
modify/delete
options to. Members will get a permissions error if they try to
modify or delete a record not owned by them unless the "manage all" box
in checked for that table in the member's profile. The syntax for
the tags is:
The table name is required because, if a search contains a mix
of data
from several related tables, the database needs to know from which
table you are deleting the current record.
Examples:
$modify[resumes,Click here to modify the
resume] Click here to modify the resume
$modify[jobopenings,<IMG SRC="/images/modify.gif">] (your
image as a link to modify the current record)
$modify[pictures] (a
default button is created if no text is specified)
$delete[resumes,Click here to delete the
resume] Click here to delete the resume
$delete[jobopenings,<IMG SRC="/images/deleteJob.jpg">]
(your image as a link to delete the current record)
$delete[pictures] (a
default button is created if no text is specified)
$member: The $member tag will
display information about the current member that is logged into the
database.
For example: <B>Welcome $member[firstname]
$member[lastname]</B> will display a welcome message to the user
with his/her name. For a complete list of member fieldnames, go
to the SQL entry page and type:
DESCRIBE _members;
$escapemember: Type
$escapemember[memberfield] to display the value of $member[memberfield]
in escaped format.
For example, if you wish to import $member[user3] into a JavaScript
variable, but you are concerned that someone may have typed:
(I am 5'11" tall.) into the box. You could not do this:
var description = "$member[user3]";
which would become: var description="I am 5'11" tall"
nor
var description = '$member[user3]';
for the same reason. But you could type:
var description = unescape("$escapemember[user3]");
which would become: var
desciption=unescape("I%20am%205%2711%22%20tall");
and JavaScript's unescape() function would convert the spaces and
quotes back to their original value.
$order: The $order tag will
generate a "Sort by" link in the header, footer, sub-footer, or search
results template. These links appear automatically when the default
layout table is displayed. If you are using the search results template
you will need
the $order tag to give your users the ability to re-sort their search
results. If the link is clicked a second time it will reverse the order
of the sort.
USAGE:
$order[table.field,optional text]
EXAMPLES:
$order[products.saleprice] Sale
Price(generates the field's display label as a link)
$order[products.saleprice,Click here to
sort by price] Click
here to sort by price
$order[products.saleprice,<IMG
SRC="/images/sortbyprice.gif" BORDER=0>]
Thumbnails: If a thumbnail size
was defined on the Preferences page prior to the uploading of any
image, a corresponding file with "_tn_" at the start of the file name
is created in the same directory as the image. You can easily
display the
thumbnail for any image by entering "$thumbnail[table.field]" into the
template, where field is the name of the image field. The server
must have ImageMagick and the Image::Magick Perl module (aka
PerlMagick)
to use this feature.
Distance: If a field is selected
next to "Search by zip code distance",
and there is a value for "_homeZip" on the search page, the "$distance"
tag will be replaced with the distance, in miles, to the zip code
indicated in the current record.
$COUNT, $SUM, and $AVG:
Each of these items will display a total based on the values in a given
field for all of the found records combined. If you want to
display the number of found records, it is a good idea to use the
primary key field with $count, since the primary key can never be
empty. $count[table.keyfield] will display the number of found
records. $sum[table.quantity]
would display the sum of all of the numbers in the quantity
field.
$avg[table.quantity] would display the average value for the quantity
field.
$dateCreated: Type
$dateCreated[table] into a template to display the date when a
record was first added
to that table.
In a simple query of a "press_releases" table, you could simply insert
"$dateCreated[press_releases]" into either the search results template
or the form view template. In a more complex query of "events",
"organizations" and "districts",
where (event <M--------1> organization
<M---------1> district) you could include information for
each event about the organization that is running it, and that
organization's district. It would be necessary to type
"$dateCreated[event]" to tell Webdata to show the date that the
event was added, not the date the organization or district was added.
Calculations: Rather than
reinvent the wheel, Webdata allows JavaScript to do all of its
calculations. The simple JavaScript commands necessary to perform a
calculation will work on over 99.9% of the browsers in use today.
JavaScript comes with
a rich set of math, text, and date functions of which you can take
advantage.
To display a calculation, determine where in your template you would
like the calculation to appear, and place a pair of script tags with
your calculation and a document.write() statement between them.
Example 1: Display quantity times price:
<B>Total Sale: </B>$
<SCRIPT>
var qty=$data[sales.quantity];
var price=$data[products.price];
var sale=qty*price;
document.write(sale);
</SCRIPT>
or, the abbreviated version
<SCRIPT>document.write($data[sales.quantity]*$data[products.price])</SCRIPT>
Example 2: Display weeks of service
<B>Years of service: </B>
<SCRIPT>
var start=$days[employees.startdate];
var now=$now;
document.write(Math.floor((now-start)/7));
</SCRIPT>
$days[table.any date field] will be substituted by Webdata with
the number of days since the year 0 leading up to that date.
$now will be substituted by Webdata with the number of days
since year 0 to the current date.
Math.floor() is just a function to round down so that we don't
display the years to 9 decimal places.
$daysSince[table.field] and $yearsSince[table.field]:
These functions will display the amount of days or years that have
elapsed between the date value in the specified field and the
present time. For example: This employee is
$yearsSince[employees.birthDate] years old.
Both functions display one decimal place of accuracy. If you need a
different format, see the JavaScript solution above under
"calculations".
$ENV[environment variable]: Displays
the contents
of the specified environment variable.
For example, put $ENV[REMOTE_ADDR] into a template to display the
user's IP address.
$user_data[form field]: Displays
the contents of the specified form field value on the user's search
page.
$include[URL]: Enter the URL of
any web
page to insert that page into your layout. For example,
if you have your header navigation bar in a file at
"http://myserver.com/headerbar.html" then you can
put $include[http://myserver.com/header.html]
into the "header for search results" to put that bar at the
top of your reports. This feature requires the LWP
perl module. The LWP module is part of the libwww bundle
which is a standard part of Perl5. Ask your system administrator about
it.
$escape[table.field] works exactly
like $data[table.field] except that the result will be hex encoded for
inserting into a URL to another script. For example, if to create
a link to Yahoo's maps, first look at the syntax for any address, such
as: "39940 Mission Blvd. Fremont, CA 94539" and see that it returns
with
this in the location box::
You will notice that the long URL contains
"addr=39940+Mission+Blvd" and "csz=Fremont%2C+CA+94539"
The plus signs where the spaces were, and the "%2C" where the comma
after "Fremont" was are examples of escaping.
You could create a link to map any address like this:
With a little bit of experimenting, you might discover that it
works just as well like this:
http://maps.yahoo.com/py/maps.py?addr=$escape[vendor.address]&csz=$escape[vendor.zip]
To display the value of a member field in
escaped format, use $escapemember[memberfield]
instead of $member[memberfield].
$format[table.field,decimals,E]
The $format[] tag is used to display floating
point numbers using a fixed number of decimal places, and conventional
commas to seperate the thousands every 3 digits. If no value is
supplied for "decimals", it will default to 2 decimal places. If
the letter "E" is included as the third parameter, the program will use
a comma for the decimal point, which is the convention in Europe
outside of the UK.
$format[table.price,2,E] - 29 956,50
(E for European formatting, uses
a comma for the decimal place and
a space for the thousands seperator)
The "Insert Field Assistant"
button is there to help reduce typos and save you time looking up
field names. When you click "Insert Field Assistant" a window will
appear
with a list of every field in the database. When you click on one of
the fields, the $data[table.field] tag will appear in the box below.
The box will also self-highlight so that you can copy it by hitting
[ctrl-c]
and then paste it into the template.
The "Template for Form View" will display your custom HTML in a
new window when the user clicks the "view" button.
Forms
When the "Form View" button or image is clicked, a new
window will open to display more details about the selected
record.
If the "Template for Form View" box is empty, Webdata will create a
table with the value of every field in the primary table and each
related
table for that field. If there is a value in the "Template for
Form
View" box, the new window will contain only the text in the template
box.
This makes it easy to design a page in an HTML program, complete with
style
sheets, and paste the HTML into the template box.
Shopping Cart
To use the shopping cart, you first must define fields in
the table which contain the product ID, the product name, product
description, and product price.
You may also create a field for the product's weight (if you will be
calculating shipping costs for UPS or FedEx), and a checkbox field for
whether an item is taxable is advisable if only some of your items are
subject to sales tax in-state. For example, in Massachusetts,
Food and Clothing are not taxed, so a camping supplies shopping cart
would need to create a "taxable" checkbox to indicate that the jacket
is not
taxed, but the camping stove is.
If you choose to define an "inventory" field, the database will
automatically deduct the quantity of each sale from the amount in that
field. When the quantity reaches 1 or less, the administrator (defined
at the top of the page) is notified via e-mail that they need to
restock.
Once you have created the necessary fields, go to the layout
which you will use for people to search and shop your products.
Check "use shopping cart", save your preferences, and then click the
"configure shopping cart" link. The "Configure Shopping Cart"
page is very straightforward. Use the first 6 select lists to indicate
which field is to be used for product ID, name, description, price,
weight, and taxable. If you have a secure web server, you may
choose to save the data on your server for retrieval (credit card
numbers are encoded). If you would like real-time processing of
the credit cards, we recommend you choose one of the card processing
services. You will need to get an account with the service you
choose. Choose the shipping and tax options you
need, click "Save Cart Settings" and then go to search the layout in
which
you enabled the cart. You will see an "add to cart" button next
to every item.
Authorize Net users: As of version 1.52h, Webdata Pro
uses the
SIM method to submit orders to the Authorize Net page. You will need to
upload
the "SimLib.pm" and "SimHMAC.pm" perl modules (included in the zip
file)
to your cgi-bin. You will also need to generate a Transaction ID at the
Authorize Net "settings" page, and enter it in the box provided.
A link will automatically appear on the main administration page
to retrieve the orders. After you fill each order, click the
"mark order as filled" link, and the item will be hidden unless you
click
"show all orders" at the bottom of the page.
Replace text within
layout(s)
The find and replace mechanism for
layouts was released in version 1.63. It is extremely useful if you
need to replace every occurrence of a table name or a domain name.
Because layouts are comprised of multiple text boxes, it would be
cumbersome to export to a word processor, perform a replace, and import
the text back in for every field. This utility allows you to replace
the text in all fields at once. From the "Manage Layouts" page,
click "Replace text within layout(s)". Then, [ctrl]-click on the layout
or layouts that you wish to replace text in. Next, enter the old text
string and new text string into the boxes below. When you submit the
form, the script will show you which fields contain your text string
and prompt you to confirm.
Members
Members are users with a unique username and password that
may log into the database. Each member may complete a profile
which contains the standard contact information, plus 10 more fields
which can be defined by the administrator in the "Preferences"
screen. If you choose to allow a member to add records into any
table, the member's ID (usually their e-mail address) is saved with the
record. It is then possible to display any information about the
member that added each record in the search results template or form
template.
From the administration screen, click on "Manage Members".
You will be taken to a list of members, with the option to add, delete,
or edit a selected member. Members that are used as a group
leader will appear first and in red text. When you choose to Add or
Edit a member, you are taken to the "Member Data Page." The top
portion of the
Member Data Page consists of contact information, followed by any
custom
boxes which the administrator has defined. This information may
be changed by the member any time from the "update profile" button
which
appears on the default member page. The bottom portion of the
page
may only be set by the administrator. The privileges for members
make it possible to offer a different database experience to each
member,
or to combine members into groups.
Using Member Fields
When a member logs in to the database, their e-mail address
is saved in a cookie. Every time the member adds a record, the record
saves the member's e-mail address in a hidden field named
"_owner". This serves two useful functions. First, the
Webdata can make sure that the member can only modify or delete records
that she added. Second, it is possible to design your layouts so
that users can search and display information about the member that
added each record. For example, if you have several comic book
dealers adding records to one large database. You could allow the
user to search for comic books entered by someone that lives in a
certain State, and you could display the
name and contact information of the member that added each comic
book. Since the member's key data (their e-mail address) is saved
in the _owner field, the fields for displaying the firstname and
lastname are labeled "table._owner.firstname"
and "table._owner.lastname". Each of these combinations is an
option in the "Search Fields" and "Sequence of [report] Fields" boxes
on the Layout page.
You also have 10 Member fields which you can label yourself.
The input boxes for Member Labels are defined on the "Preferences" page.
Regardless of the label you enter, the true NAME of these
fields is "user1, user2, user3, etc". You will need to select the
correct "user#" field when adding a custom Member field to a
layout. For example, let's say you wanted each comic book dealer
to announce their specialty. You could insert "Specialty"
in the "user1" box on the "Preferences" page. Then, when you
select "table._owner.user1" from the "Search Fields" list, a box
labeled "Specialty" would appear on the search page. You can also
select the size of each user
box on the preferences page from a list of standard sizes.
Exporting Member Data
From the "Manage Members" page, the administrator can choose to export
the entire _members table as either comma or tab delimited text. This
may be useful for backing up the database, or importing the member data
into a 3rd party program such as address labeling software.
Member Groups - If you want to
assign the same privileges to 1500 members it is much easier to use
groups than to enter the preferences into each member's profile.
Plus, if you
need to make a change to each member's privileges, and you are using
groups, you only need to make the change once. To create a group,
first create a new member, and enter the group name as the member's
e-mail address.
Enter the group name again as the member's first name. You may
leave
the rest of the contact info boxes blank. Skip down to the
Privileges
section and set the group privileges. Now, when you add or edit
any
member, choose the group name from the select list next to "Member
Groups." This will override the remainder of the Privileges
section, anything else you select or check in this section will be
ignored.
Layouts: If this member has
search privileges, select the layout(s) which s/he may use.
Because
a layout includes some, but usually not all, of the fields in the
database, you can restrict what information a member is privy to by
restricting
which layouts they may use. If only 1 layout is selected, the
search
button on the member page will go directly to the search page for that
layout (whether that is a default search page or a custom page depends
on whether there is a value in the "URL for Search Again" box in that
layout). If 2 or more layouts are selected the member will
presented with a layout selection box after clicking "Search". If
no layouts are selected, the "Search" button will not appear on the
member page at all.
Default URL: If there is a value
in this box, the member will be taken directly to this URL instead of
loading the default member page. You may choose SAVE-AS on the
default member page, customize it to match your site, and then enter
the URL here. You could also enter the URL of a specific custom
search page so that the member would go directly into a search without
seeing the member page first. There are many ways to customize
the
member's experience by creating a custom member page.
Header and Footer: The
HTML contained in these boxes will appear at the top and bottom of the
default member page, the search pages, and the "update profile" page.
Template for Member
Data page: The HTML contained in this box will appear instead of
the default Contact Information page when the member signs up or clicks
"Update Profile" to change their password, address, or phone number.
To indicate
where Webdata should create a text box for the "firstname" field with
the current value already filled in, just type $field[firstname]
into the template.The "Insert Field Assistant" can reduce
typos
by generating the tags for you.
Retrieve Shopping
Cart Orders: If you are using the shopping cart and select to save
orders on the server rather than use a payment service, there will be a
link on the main administration screen to view the orders, including
credit card
numbers. Note: Please only use a secure SSL connection to connect to
this
page to avoid sharing your customer's credit card numbers with prying
eyes.
If your client needs a way to view the orders without logging in
as
admin, you may check this box on his/her profile and then create a link
on
his/her custom member page by copying the one on the main
administration
page. For security reasons, the member should always log in and
then
click the link to view the orders. It will not render the page if the
referrer
does not match the script URL or the secure URL defined in the cart.
Custom Member Fields: In
addition to the contact information which Webdata can store for each
Member, you
may define up to 10 more fields which appear on the member profile
page. The size option defines how big each box will be when it is
displayed
on the member profile page. To define a pop-up list, choose "List..."
from the bottom of the size choices list, and a prompt box will allow
you
to enter the possible values seperated by a comma. For example:
"Red,Green,Blue".
Table Privileges Grid:
Use the checkboxes to determine, for each table in the database,
whether the member may add records, modify or delete records they have
added, import from delimited text files, or export to a delimited text
file.
Manage All: When this box is unchecked, the "add",
"modify",
and "delete" permissions refer only to records which are "owned" by
that
member. If "Manage All" is selected for any given table, that
member
becomes a "super-user", with the ability to modify or delete records
owned
by other members (provided "modify" and "delete" are checked).
Limit to 1 Record: When this box is checked, when a member
chooses to manage data in this table, they are not taken to the "Data
Entry" page, but instead are taken directly to the "Maintenance Screen"
for their one and only record.
Custom Member Page: You can create a custom HTML page to be
displayed when a member first logs in. To create a custom member page,
first
log in as a member and choose SAVE-AS from the FILE menu when the
default member page appears. Save the page to your hard disk as an html
page and modify it with your favorite HTML editor. Finally,
upload
it anywhere on your server, log in as admin, and enter the URL to your
new custom page in the "Custom Member Page" box in that member's
profile.
The Custom Member Page will also be aliased to the group leader if
groups
are used.
Member Homepage Template: As
an alternative to the Custom Member Page URL above, you can also paste
the HTML for a member page into the "Homepage Template" box. This
gives you the ability to dynamically display information about
the member.
For example, to put a personalized greeting at the top, type:
<B>Welcome $member[firstname] $member[lastname]</B>
If you had labeled the "user1" field as "Description", and you
wanted to import it into JavaScript for some reason (perhaps to write
it
into a new window), you might need the $escapemember[] tag to avoid
conflicts with quotation marks. For example: var desc = "$member[user1]";
will not work if $member[user1] contains a double quote. Since you can
never tell what users might type, it is safer to do this: var desc = unescape("$escapemember[user1]");
The escapemember tag will convert quotes into a %hex value,
and then JavaScript's unescape() function will convert them back.
You may also use the $if
statement in this template. For example: $if ($member[telephone]) {$member[telephone]<BR>}
would print the phone number and a line break if there is a
value in the phone number field. $if ($member[user3] > 10) {<B>Gold Club
Benefits</B>}
would print "Gold Club Benefits" if the value in the (admin
defined) user3 field is greater than 10.
Finally, the $query[] tag will
also work on this page.
"Modify Record" Template: The Maintenance Screen which
appears when a record is selected to modify, or when "Limit to 1
Record" is checked can be modified using the template saved in a hidden
field
beside each of these buttons. Modifying the Maintenance Screen
not only allows you to make the page match the look and feel of your
site, it also gives you the ability to hide certain fields, so that a
member may only modify the fields that you want them to be able to
modify.
Each button opens a floating window with the current template in a
large
textarea box. The "Save" button copies the contents of the window
into the hidden field next to the button. The "Cancel" button
closes the window with no changes. The "Insert Field Assistant"
opens a small floating window which will create a $field[fieldname] tag
for the desired field.
The Maintenance template works just like the Search Results
template and the Form View template. Inserting $data[fieldname]
will
display the current value of a field into the page. You do not
need to include the table name because in this context the table name
is implied. Inserting $field[fieldname] will automatically insert
the field's default form element (textbox, list, checkbox, etc) with
the correct value inserted/selected.
If you do not include a $field[fieldname] tag for any given
field, Webdata will automatically add a HIDDEN tag to the form with
the fieldname and value so that the original value will be
preserved.
If you should wish to create your own form element, rather than using
the $field tag (this is not recommended because it will not have the
correct
default value), you should give the form element an obscure name, and
use
JavaScript to replace the HIDDEN input box's value with the value in
your
custom form object. Creating a form element with the name of a
field will result in two values for the same field being passed to the
database, which is automatically interpreted as "val1 or val2" because
the program assumes that a multiple select list was used.
It is important to note that you should not include any
<FORM>,<INPUT>,<SELECT>, or <TEXTAREA> tags
of your own in the template. Webdata will create its own
<FORM> tags, so adding your own will interfere with the default
form. Also, you should use the $field[x] tags
to instruct Webdata to put an input, select, or textarea tag where you
want them. This way, the box will appear with the current value
for that field displayed. If you add your own tags, the form will
be sending two values for the same fieldname to the database, which
will cause unwanted results.
"Thank You" template: You may enter HTML into this screen
which will be displayed instead of the JavaScript alert prompt when a
member adds or modifies a record into that table. This allows you
to
offer the member a confirmation of the values they entered and provide
further instructions and links. Use $data[fieldname]
each place a field value should go. The "Insert Field Assistant"
makes it easy to copy $data[] values into the template without typing
mistakes.
Also, $showdata will generate a simple list of all the fields
and the submitted values. This is a convenient shortcut if you do not
particularly need to customize the page.
Instant Members
Whether you run a free service or pay-for-membership site,
the Instant Members tool can allow you to manage the options and
privileges available to members that sign themselves up on-the fly to
your database. Each instant member profile can be grouped to a
member and have its own optional welcome letter and expiration date.
This allows you
to create an unlimited number of membership configurations, all of
which
can be automated to allow members to sign up on-the-fly either with or
without going through a payment service. Link to the first Instant
member
using the URL of the script followed by "_cgifunction=Instant+Member".
For
the second member, use "_cgifunction=Instant+Member2" and replace the 2
with the correct number for all Instant Member configurations after
that.
To set up or edit a Instant Member, first click "Configure Instant
Members"
on the "Manage Members" page. Next, click
"Add
New Instant Member" or choose and existing one from the list and click
"Edit
Selected Instant Member". You may also click "Delete Selected Instant
Member"
to remove an Instant Member profile. On the Instant Member form
you
will see the following options:
Description: This field has no functional purpose and exists
only to provide you, the administrator, with a reminder of which
Instant Member profile is used for what purpose.
Group To: This is the member profile that the new instant
members will be grouped to. On the
"Manage Members" page, Create a new member named
"Group for Instant Member" or some other description as the e-mail,
enter some jiberish as the password, and split up the description among
the first
and last names, for example "Group for" as the first name and "Instant
Member" as the last name, so that it will display nicely in the member
list. You do not need to enter any other contact information.
Use
the templates, USERx labels, layout privileges, and table privileges to
set all of your preferences for your Instant Member group. Then,
when defining your new Instant Member, select "Group for Instant
Member"
from the list of member names in this field.
Referring URL: A new member is created simply by browsing
to /cgi-bin/webdata_pro.pl?_cgifunction=Instant+Member or Instant+Member2,
etc. In a "Pay for Membership" system, you can set the "Return
URL" on a payment gateway such as "Paypal" or "Authorize Net" to the
URL above. In order to ensure that would-be thieves to not
circumvent your payment system and browse directly to the "_cgifunction=Instant+Member"
URL, you can enter all or part of your payment service's URL into this
box. If you enter "https://www.paypal.com/" into the box, then
the script will return an error unless the HTTP_REFERER value contains
"https://www.paypal.com".
Welcome Letter: Webdata Pro can automatically send an e-mail
to your new members to welcome them to the system and provide them with
useful links and information which they can save in their INBOX for
future refererence. Frequently you will want to include the email
address and password used. Although there is a minor security risk in
sending this e-mail without encryption, it is negligable, and many
users appreciate having an e-mailed record of their login choices.
Type $email and $password into the message to
include the login e-mail and password. The default Subject is
"Membership Confirmation". To specify your own Subject for the e-mail,
type $subject[Your desired subject line] anywhere in the
message. The default "From" address is the admin e-mail address
on the preferences page. To specify your own "From" address, type $from[your
desired e-mail address] anywhere in the message. For example:
Thank you for joing our database.
Please save this e-mail for your records.
The member login page is located at http://www.myserver.com/members.html
Your e-mail in our records is: $email
Your password is: $password
Your account will expire on: $expires
Best Regards,
Joe Smith
http://www.myserver.com
$subject[Welcome to the myserver.com database]
$from[membersupport@myserver.com]
(Subscription Memberships)
Expires In: Frequently memberships are sold on a subscription
basis. This box allows you to set an "expiration date" for the
new Member. As admin, you may edit this date in each individual
Member's profile if necessary. In the preferences page for the
GROUP member that this Instant Member setting is grouped to, you may
also set the number of days prior to expiration in which a renewal
letter will be e-mailed (so long as the server is calling "_cgifunction=cron" to the
script at least once per day). The contents of the letter, referrer
restrictions on renewing the membership, and a renewal thank-you letter
are also defined in the GROUP member page.
You can allow different subscription packages by defining multiple
Instant Members. For example, lets say you are selling the following
subscriptoins:
1 Month - $10
3 Months - $25
1 Year - $70
Create a group named "subscibers group" with all of the privileges
and template settings you want to display to your subscribing members.
Then create 3 "Instant Member" profiles. Each one will be grouped to
the "subscribers group" and will have your payment service as the
Referring URL.
However, the first one will have "1 Month Subscription" as the
description, and the expiration will be set to "1 Month". Do the
same for 3-Month and 1-Year.
Whether the welcome letter is the same or different amongst them is up
to you.
Finally, create a sign-up page which links 3 different products to
your payment service, "1-month", "3-month", and "1-year".
Set up the RETURN URL in your payment service such that the "1-month"
product forwards successfully paying customers
to http://www.yourserver.com/cgi-bin/webdata_pro.pl?_cgifunction=Instant+Member.
Set up the RETURN URL of the "3-month" product to forward
customers to /cgi-bin/webdata_pro.pl?_cgifunction=Instant+Member2.
Use /cgi-bin/webdata_pro.pl?_cgifunction=Instant+Member3
for the RETURN URL of the "1-year" product.
Now your new membership system is ready to go. The next step is to
automate the renewal system.
Create a page named "renew.html" on your server and create links to
your payment service for the
following 3 products: "renew 1-month", "renew 3-month", and
"renew 1-year". Also include a textbox
in the form for the user's e-mail. Most payment services can pass a
value from the user-submitted form
to the RETURN URL. You will want to set the return URL for the
"renew 1-month" product as follows: http://www.yourserver.com/cgi-bin/webdata_pro.pl?_cgifunction=Renew&email=$[EMAIL]&expiresafter=30
where $[EMAIL] is your payment service's syntax for including
the value of the "EMAIL" field from your
original form, or you may choose to use the email field generated in
the payment form so long as the user
understands that they must enter the same one they used when they
signed up for the database. Create
similar product settings in your payment service for the other 2
renewal types with the value of "expiresafter"
changed accordingly.
Now return to the Manage Members page and edit the member profile for
your Instant Member group leader.
Enter a number in the box marked Send Reminder this many days
before expiration. Type a letter to be
mailed to each member that many days before they are set to expire.
Again, this will only work if the cron
is set up. In the letter, instruct the member to browse to
"http://www.yourserver.com/renew.html" to renew
their membership.
Just as with the initial sign-up, we can specify the URL of your
payment service to ensure that nobody can
call ?_cgifunction=Renew unless the HTTP_REFERER matches your
payment gateway. Enter the URL
to your payment service into the "Renewal Referrer" box.
Finally, after they renew you may send the member a letter of thanks.
Enter the text of the letter into the
"Renewal Thank You Letter" box.
Cron - Scheduling the reminders and deletions:
Webdata Pro will delete all expired members and send reminder letters
out whenever it is executed with _cgifunction=cron as a
parameter.
As a scheduled server task:
On a Unix/Linux server, sometimes there is an option
for users to define their own scheduled tasks also known as cron
jobs, otherwise you will need to ask your system administrator
to set up the cron job for you.
On a Windows server, automated tasks are handled by the
schedular, located in the Control Panel.
In either case, set it up such that once every night
"/path/to/cgi-bin/webdata_pro.pl
_cgifunction=cron"
is executed. When calling Webdata Pro from the command
line, because it uses the CGI.pm module to
import the name=value pairs, you can simple enter the path to the
webdata_pro.pl script,
followed by a space and then _cgifunction=cron.
As a scheduled client browser task:
If you cannot get assistance from your system administrator, it is
also possible to schedule a PC (or Mac or anything) on
a dedicated internet connection to browse to http://www.yourserver.com/cgi-bin/webdata_pro.pl?_cgifunction=cron
remotely. This is slightly less preferable because it will fail if
the local internet connection goes down, and since it uses
the web server to execute the task, it is always possible that the
server could time-out before all of the messages have
been sent.
1. Click the "Add Scheduled Task" Icon: Windows2000: Control-Panel -> Scheduled
Tasks ->Add Scheduled Task. Windows XPpro: Control-Panel ->
Performance & Maintenance -> Scheduled Tasks ->Add Scheduled
Task.
2. Select "Internet Explorer" (or any browser) and click "Next".
3. Choose "Daily" and click "Next".
4. Choose a time in the middle of the night (less internet traffic
and server load), select "Every Day" and click "Next".
5. If necessary, enter your username and password when promptedand
click "Next"
6. Check the "Open advanced properties..." checkbox and click "Finish"
7. When the "Advanced Properties" box opens, place the curser just
after "EXPLORE.EXE" and type a space
followed by the URL of your script followed by
?_cgifunction=cron. For example:
C:\PROGRA~1\INTERN~1\IEXPLORE.EXE
http://www.yourserver.com/cgi-bin/webdata_pro.pl?_cgifunction=cron
SQL Entry
This page gives the administrator the ability to enter raw
SQL into the database if it should ever become necessary. The
feature can be turned off by setting $sqlEntry to zero in the header of
the script. Because the DBI module creates a link directly into
the specified database, it is not possible to execute commands
regarding other databases.
Of course we have tried very hard to make Webdata a robust
interface so that you should never need to use SQL. However, if
you should ever encounter a situation where the database is not
behaving properly, you may need this interface in order to repair it.
You do not need to end your commands with a semicolon. Enter
a command into the box at the top and click "Enter". When the
page refreshes, your command followed by the results will appear in
the lower box. All previous results will remain in the box until
you either click "Clear" or exit the page. Your command is retained in
the upper box so that, if you have an SQL error, you can fix it without
retyping the entire command. The Print button opens a small
floating
window with the contents of the lower box. Using JavaScript, it
immediately
executes a print() command, displaying the print dialogue box, and then
closes itself. The up and down arrow buttons will recall
previously
entered SQL statements for your convenience.
Preferences
Admin E-mail Address: If
an e-mail address is entered in this box, a copy of each new record
added to the database will be sent to that address. Path to Sendmail: On most
Unix-based servers, just enter "/usr/lib/sendmail" into this box.
On a Windows Server, "blat" should be installed and the path to Blat
may be entered here. Use European Dates:
When this box is checked, all dates, both for input and display, will
use the "dd/mm/yyyy" format, instead of the American "mm/dd/yyyy"
format. Allow Instant Members: When
this box is checked, you may put a link on your homepage like
this:
<A
HREF="/cgi-bin/webdata_pro.pl?_cgifunction=Instant+Member"> Click
here to create a member profile </A> Instant Member Group: Members may be grouped by aliasing
their privileges to another member. You should create one member
account which has the correct privileges for instant members, then use
this
list to choose that member. Whenever a new instant member is
created, (s)he will have the same privileges as the member you choose. Instant Member Referers: This feature allows you to set up
Webdata as a "pay for membership" site. If you have an account with a
card processing service, set up the return URL to point to your script,
followed by "?_cgifunction=Instant+Member". For example:
http://www.yourserver.com/cgi-bin/webdata_pro.pl?_cgifunction=Instant+Member.
Then, enter the domain name of your card processing service into the
"Instant Member Referers" box. If someone tries to browse
directly to the instant member URL without going through the payment
service the program will display an "Invalid Referer" message.
You may more
than one referer by placing a comma in between each one.
Instant Member Welcome E-mail: If you type a message into
this box, it will be e-mailed to new members as soon as they have
signed up. This allows you to greet the new member, supply introductory
instructions, and remind them of the e-mail address and password which
they used when they signed up. The following keywords allow you
to customize
the message:
Any occurrence of $email will be replaced with
the member's e-mail address.
Any occurrence of $password will be replaced with
the member's password.
One occurrence of $subject[text]
will be removed, and text will be the Subject of the e-mail message.
One occurrence of $from[you@yourserver.com] will
be removed, and the message will be from you@yourserver.com.
Welcome to the MyServer
Online Database Community.
Your login details are as
follows:
E-mail: $email
Password: $password
To log in, browse to http://www.myserver.com/loginpage.html
You may change your
password or any of your contact information
by clicking "Update Profile"
after you log in.
Thank you for using the
MyServer Online Database.
Please direct any
questions to mailto:support@myserver.com
Please note: the message is sent in plain text
only. The blue links in the example above
demonstrate how most e-mail programs will
automatically render any string beginning
with "http://" as a link, and any string
beginning with "mailto:" as a mail link.
Instant Member 2: You may have 2 types of instant members.
Each one may be linked to a different member as the group leader.
This enables you to invite people to automatically sign up as "buyers"
or "sellers", for example. To sign someone up as the
Instant Member 2 type, create a link (or return URL from your payment
processor) to:
http://www.yourserver.com/cgi-bin/webdata_pro.pl?_cgifunction=InstantMember2
Search Logs: When this box is
checked, any time someone searches a layout using any search criteria,
the
search criteria is saved in the _searchlog table, along with the exact
time and the user's IP address. Also, when any user clicks the
"view" button in a layout, the key value of the selected record is
saved
in the _viewlog table along with the exact time and IP address.
The "view report" link will display a list of all the search terms and
records viewed, sorted by the number of times each was used. You
may also create a layout using
$data[_searchlog.searchterm] as well as the $count summary
function. Finally, if you happen to know SQL, you can create very
specific and customized queries of the _searchlog and _viewlog tables
in the SQL
entry screen.
Thumbnails: If you have
ImageMagick
on your server, the script will automatically create a smaller copy of
each image uploaded through an "upload" field. This box allows
you to specify the width of all thumbnail images. The
height will be calculated according to the original file's size.
This will
make your report pages load faster, especially for users on telephone
line
connections. Then, you can design your forms so that the user will see
the full sized image when the click the "view" button. See Uploading Images for more information. Duplicate Submission Timer:
A common problem with internet databases is duplicate submissions. If a
user does not get a response page right away, they will frequently
click "submit" again, resulting in two or more records when there
should only be one. Webdata Pro will not allow a record with
values that match the previous record exactly to be submitted until the
number of seconds contained in this box have passed. There may be
situations, such as a "please enter your vote" table, in which it is
very likely that you will get a rapid sequence of identical records, in
which case you will want to set this
box to 0.
Debug mode is a diagnostic mode which may help to
determine the cause of errors. When enabled, the values submitted from
the previous form will be displayed at the top of each page, and all
SQL statements will be displayed. If you ever get an SQL error, please
turn on debug mode before contacting Webteacher's support BBS at http://www.webteacher.com/webdata/bbs.
If for some reason you are not able to check the 'Debug Mode' box
on the Preferences page, debug mode may also be turned on by setting
$debug to "1" in the webdata_pro.pl script.
License
SOFTWARE PRODUCT LICENSE
WEBTEACHER SOFTWARE, LLC, a
California Limited Liability Company owns the copyright and
intellectual property and documentation for its Webdata software
program (hereafter collectively referred to as "Software"). The
Software is protected by United States copyright and intellectual
property laws and international copyright
and intellectual property treaties, as well as other international
property laws and treaties. The Software is licensed, not sold. This
legal document is an agreement between you, the end user and WEBTEACHER
SOFTWARE.
By installing this software,
you acknowledge you have read, understand, and are agreeing to become
bound by the terms of this agreement, which includes the software
license,
limited warranty and exclusion of liability.
If you do not agree to the
terms of
this agreement, promptly dispose of all downloaded materials, disks,
documentation, and packaging materials.
Provided you agree to the terms as
required, WEBTEACHER SOFTWARE grants you a nonexclusive license to use
the Software provided under the following terms and conditions:
1. LICENSE GRANT.
a. Software Product.
WEBTEACHER SOFTWARE grants you as an individual, a personal,
nonexclusive license to install the Software on a web server for usage
on a single web site. A site is defined as a unified collection of web
pages which pertain
to a single person, company, organization, topic, or project. You may
not grant others the right to use your license. You may define as many
tables and layouts as needed within a single instance of the software,
provided the software is only used to support a single site for every
license
purchased. Web professionals may not extend the license to more
than one client per license. (For example, you may install 1 database
under a single license to list your products, phone numbers, and
events.
You may not install databases for others without paying additional
registration
fees).
If you are an entity,
WEBTEACHER SOFTWARE
grants you the right to designate one individual within the
organization to have the right to use the Software in the manner
described above. WEBTEACHER SOFTWARE recognizes that there are certain
circumstances
in which it would be commercially impractical to install the Software
on a computer and permit multiple individuals to use it (e.g., install
the Software on a computer in a law library or in a training facility
and permit multiple individuals to administer and publish Web Databases
using the Software over time). Using the Software in this manner is in
violation of this license agreement. If you wish to use the software in
this manner, please contact WEBTEACHER SOFTWARE at (949) 260-9354 to
discuss.
Depending on the circumstances, WEBTEACHER SOFTWARE, at its sole
discretion,
may provide you with a rider permitting this alternative use.
b. Software Transfer.
You may
permanently transfer all of your rights under this Agreement, provided
you
comply with the following conditions: (i) you retain no copies or prior
versions, (ii) you transfer all of the Software including the media and
printed
materials, and (iii) the recipient agrees to the terms of this
Agreement.
c. Electronic Documents.
Solely with respect to the electronic documents included with the
Software (e.g., the electronic version of the user guide), you may make
an unlimited number of copies (either in hard copy or electronic form),
provided
that such copies shall be used only for internal purposes and are not
republished or distributed to any third party.
2. COPYRIGHT.
WEBTEACHER SOFTWARE holds
exclusive ownership of the Software and all intellectual property
rights embodied therein, including copyrights and valuable trade
secrets incorporated in the Software's design and coding methodology.
The Software is protected by United States copyright laws and
international treaty provisions. This Agreement provides you with only
a limited use license, and does not
grant you any intellectual property rights in the Software.
3. REVERSE ENGINEERING. You
agree that you will not attempt to: (i) modify, revise, alter, copy,
duplicate, replicate, sell, transfer, destroy or translate all or any
portion of the Software; (ii) decompile, or disassemble all or any part
of the Software, (iii) create derivative works based on all or any part
of the Software; (iv) merge all or any part of the Software with
another product; or
(v) remove, tamper with or obscure any proprietary rights, notices, or
labels on all or any part of the Software.
4. LIMITED WARRANTY;
LIMITATION OF LIABILITY.IF YOU PURCHASED THE PRODUCT,
WEBTEACHER SOFTWARE WARRANTS TO YOU THAT THE SOFTWARE SHALL PERFORM
SUBSTANTIALLY IN ACCORDANCE WITH ACCOMPANYING DOCUMENTATION UNDER
NORMAL USE FOR A PERIOD OF NINETY (90) DAYS FROM THE PURCHASE DATE;
OTHERWISE, IF YOU RECEIVED THE PRODUCT FREE OF CHARGE FOR THE PURPOSE
OF EVALUATING IT, WEBTEACHER SOFTWARE DOES NOT PROVIDE YOU WITH A
WARRANTY OF ANY KIND, AND YOU ACCEPT THE PRODUCT
"AS IS."
THE ENTIRE AND EXCLUSIVE
LIABILITY AND REMEDY FOR BREACH OF THIS LIMITED WARRANTY SHALL BE, AT
WEBTEACHER SOFTWARE'S OPTION, EITHER (I) RETURN OF THE PURCHASE PRICE
OF THE SOFTWARE, IF THE PRODUCT WAS PURCHASED, OR (II) REPLACEMENT OF
DEFECTIVE SOFTWARE AND/OR DOCUMENTATION PROVIDED THE SOFTWARE AND/OR
DOCUMENTATION IS RETURNED TO WEBTEACHER SOFTWARE WITH PROOF OF
PURCHASE. WEBTEACHER SOFTWARE AND ITS SUPPLIERS SPECIFICALLY DISCLAIM
THE IMPLIED WARRANTIES OF TITLE,
NON-INFRINGEMENT, MERCHANTABILITY, AND FITNESS FOR A PARTICULAR PURPOSE.
THERE IS NO WARRANTY OR
GUARANTEE THAT THE OPERATION OF THE SOFTWARE WILL BE UNINTERRUPTED,
ERROR-FREE, OR VIRUS-FREE, OR THAT THE SOFTWARE WILL MEET ANY
PARTICULAR CRITERIA OF PERFORMANCE OR QUALITY EXCEPT AS EXPRESSLY
PROVIDED IN THE LIMITED
WARRANTY. NO ACTION FOR THE ABOVE LIMITED WARRANTY MAY BE COMMENCED
AFTER
ONE (1) YEAR FOLLOWING THE EXPIRATION DATE OF THE WARRANTY. IF IMPLIED
WARRANTIES MAY NOT BE DISCLAIMED UNDER APPLICABLE LAW, THEN ANY IMPLIED
WARRANTIES ARE LIMITED IN DURATION TO NINETY (90) DAYS FROM THE
PURCHASE
DATE.
Note: Some states do not
allow limitations
on how long an implied warranty may last, so the above limitations may
not
apply to you. this warranty gives you specific rights, and you may have
other rights which vary from state to state.5. LIMITATION ON DAMAGES.
INDEPENDENT OF THE FOREGOING PROVISIONS, IN NO EVENT AND UNDER NO
LEGAL THEORY, INCLUDING WITHOUT LIMITATION, TORT, CONTRACT, OR STRICT
PRODUCTS LIABILITY, SHALL WEBTEACHER SOFTWARE OR ANY OF ITS SUPPLIERS
BE LIABLE TO YOU OR ANY OTHER PERSON FOR ANY INDIRECT, SPECIAL,
INCIDENTAL,
OR CONSEQUENTIAL DAMAGES OF ANY KIND, INCLUDING WITHOUT LIMITATION,
DAMAGES FOR LOSS OF GOODWILL, EMOTIONAL DISTRESS, EXPENSES, COSTS, LOST
PROFITS, LOST SAVINGS, BUSINESS INTERRUPTION, LOSS OF BUSINESS
INFORMATION,
COMPUTER MALFUNCTION, OR OTHER DAMAGES ARISING OUT OF THE USE OF OR
INABILITY
TO USE THE PROGRAM. EVEN IF WEBTEACHER SOFTWARE HAS BEEN ADVISED OF THE
POSSIBILITY OF SUCH DAMAGES. UNDER LOCAL LAW, CERTAIN LIMITATIONS MAY
NOT
APPLY, AND YOU MAY HAVE ADDITIONAL RIGHTS WHICH VARY FROM STATE TO
STATE.
IN NO EVENT SHALL WEBTEACHER
SOFTWARE'S LIABILITY FOR DAMAGES FOR ANY CAUSE WHATSOEVER, AND
REGARDLESS OF
THE FORM OF ACTION, EXCEED THE AMOUNT OF THE PURCHASE PRICE PAID FOR
THE SOFTWARE.
6. WARRANTY DISCLAIMER
(a) EXCEPT AS EXPRESSLY SET FORTH ABOVE, NO OTHER WARRANTIES
ARE MADE WITH RESPECT TO THE PROGRAM. WEBTEACHER SOFTWARE EXPRESSLY
DISCLAIMS ALL WARRANTIES NOT STATED HEREIN.
(b) WEBTEACHER SOFTWARE DOES NOT WARRANT THAT THE FUNCTIONS
CONTAINED IN THE PROGRAM WILL MEET LICENSEE'S REQUIREMENTS OR THAT THE
OPERATION OF THE PROGRAM SHALL BE UNINTERRUPTED OR ERROR-FREE.
(c) LICENSEE ASSUMES RESPONSIBILITY FOR THE SELECTION OF THE
PROGRAM TO ACHIEVE THE RESULTS INTENDED BY LICENSEE AND FOR THE
INSTALLATION, USE, AND RESULTS OBTAINED FROM THE USE OF THE PROGRAM.
7. MISCELLANEOUS. (a) This
agreement
shall be interpreted according to the laws of the state of California
and
is binding on the parties hereto, their heirs, successors, and assigns.
(b)
If either party breaches this agreement and a lawsuit is brought
thereon,
the prevailing party shall receive as additional damages reasonable
attorney's
fees and costs. (c) The paragraph headings are for convenience only and
do
not limit, modify or interpret this agreement. (d) In this agreement
when
the text so indicates, the singular shall include the plural and
vice-versa
and the masculine, feminine and neuter genders shall also include the
other
genders. (e) If any provision of this agreement is found illegal,
unenforceable
or invalid, the remaining provisions shall nevertheless be carried into
full
force and effect. (f) This agreement represents the entire
understanding
of the parties; there are no other warranties or representations,
whether
written or oral, affecting this agreement. (g) This agreement cannot be
modified,
altered or changed in whole or in part unless by a writing signed by
the
affected parties. (h) Jurisdiction and venue for any legal dispute
involving
this Agreement shall be Oakland, California.
8. UNITED STATES GOVERNMENT
USE. WEBTEACHER
SOFTWARE represents that the Software and its documentation were
developed
at private expense and no part of same is in the public domain. The
Software
is Commercial Computer Software provided with RESTRICTED RIGHTS under
the
Federal Acquisition Regulations and agency supplements to them. Use,
duplication,
or disclosure by the U.S. Government is subject to the restrictions as
set
forth in subparagraph (c)(1)(ii) of the Rights in Technical Data and
Computer
Software clause at DFAR 252.227-7013 et. seq. or subparagraphs (c)(1)
and
(2) of the Commercial Computer Software Restricted Rights at DFAR
52.227-19,
as applicable. Manufacturer is WEBTEACHER SOFTWARE, 5405 Alton Parkway,
#5A-370.
Irvine, CA 93604.
9. Fraudulent or Unfulfilled
Promise of Payment. WEBTEACHER SOFTWARE retains the right to remotely
disable the Software, without further notice to you, in the event that
false, misleading, deceptive or fraudulent information is presented at
the
time of payment, or if a stolen bank card or credit card issused, or
if payment is not received in accordance with the terms and conditions
of a promissory note or Purchase Order. You expressly consent to this
remedy and expressly waive, relinquish and discharge any claims, losses
or damages that might arise from such an exercise of rights.
10. LICENSEE ACKNOWLEDGES THAT
HE OR SHE HAS READ THIS AGREEMENT, UNDERSTANDS IT,AND AGREES TO BE
BOUND BY ITS TERMS AND CONDITIONS. LICENSEE FURTHER AGREES THAT IT IS
THE COMPLETE AND EXCLUSIVE STATEMENT OF THE AGREEMENT BETWEEN LICENSEE
AND WEBTEACHER SOFTWARE AND THAT IT SUPERSEDES ANY PRIOR AGREEMENT,
ORAL OR WRITTEN, AND ANY OTHER COMMUNICATION BETWEEN LICENSEE AND
WEBTEACHER SOFTWARE RELATING TO THE SUBJECT MATTER OF THIS AGREEMENT.
Should you have any questions
concerning this License Agreement or Limited Warranty, or if you desire
to contact WEBTEACHER SOFTWARE for any reason, please submit all
correspondence
in writing to WEBTEACHER SOFTWARE 5404 Alton Parkway, #5A-370. Irvine,
CA 92604., or by e-mail through our Web site at www.webteacher.com.
WEBTEACHER SOFTWARE, the
WEBTEACHER SOFTWARE logo, and Webteacher's Webdata are trademarks of
WEBTEACHER SOFTWARE.
Webdata creates the following tables the first time it is
executed:
_layouts The contents of each layout
_members The contact information and privileges for each
member
_instantmembers The settings for instant member types.
_preferences The contents of the "General Preferences" page
_relationships The contents of the "Relationships"
page _countersis not currently being used, but may be used to
save permanent variables in future revisions.
_tablename: For each table, Webdata has a corresponding
_table which contains the Display information about each field in
the table.
Relational Queries.
The following is an explanation of how Webdata determines the correct
join syntax when executing select statements involving multiple
tables. When a search is executed, Webdata makes a list of the
tables used in
the search page and the results for the selected layout. The program
then
searches the _relationships table to determine which table is the "left
most", i.e.. which table does not appear on the "one" side of a
one-to-many
relationship with another selected table. That table is
considered
to be the primary table. It appears after the word FROM, while
all the other tables appear only after the words "LEFT OUTER
JOIN".
When a record is selected to be opened in form view, the database again
searches the _relationships table, this time starting with the primary
table and finding each related table recursively. The key value
for
the "primary" table is the WHERE clause in the form view. A
report
field may contains table._owner.memberfield, to indicate information
about the member that added a record, for example
"classifieds._owner.firstname", "classifieds._owner.lastname", etc. On
a search page, the same fields
would be written "classifieds_MemberTable.firstname",
"classifieds_MemberTable.lastname", which is the table alias used in
the select statement. The primary
key of the _members table is "email", so the program converts requests
for "table._owner.firstname" into "SELECT table_MemberTable.firstname
FROM table LEFT OUTER JOIN _members AS table_MemberTable ON
table._owner=_members.email".
Search Logic. If 2
different field contain a value in a search form, they will be
evaluated as an AND condition. For example, if I choose "Mazda"
in the Make field of a cars database, and enter "red" in the Color
field,
the database will search for records where Make="Mazda" ANDColor="red".
Only records where both conditions are true will be displayed.
If the word "OR" is contained in a search box (with a space
on either side of the word, or course), the database will match records
that contain either the criteria before or after the word OR,
but still with that field. For example, to search for red, blue,
or green cars, I could type: "red or blue or green" in the Color
field.
If the word "AND" is contained in a search box (and there
is
a space on either side of the word, and the criteria does not begin
with
the word "between", which is used for numeric range searches)
then
the database will match records which contain both the criteria before
and
after the word AND. For example, If I enter "cruise and
tilt"
into the Extras field, then any record that contains the word
"cruise" and contains the word "tilt" anywhere in that field will be
returned, including "tilt,pw,pl,cruise,air,amfm,cd".
If both the word "OR" and the word "AND" are
contained any number of times in the same search field, the AND's
will be grouped together first.
For example, searching the Extras field for "cruise and tilt or
air or amfm and cd" will be evaluated by the script like this:
(cruise and tilt) or (air) or (amfm and cd)
and any car that has both cruise and tilt will be
returned, plus any car that has air will be returned, and any
car that has both amfm and cd will be returned.
Wildcards can be used to specify
the
beginning or end of a search word. For example, entering m*
in a field will return all records that have values which begin with
"m"
in that field. Likewise, entering *m will return values
that end with "m". Entering *m* will work, but it is
pointless
since simply entering m in the box will have the same
effect.
If you want to find records that contain only an exact match, you
should
put quotes (either single or double) around your search criteria.
For
example, entering male will return male, malenthorp,
and female, but entering "male" in the field box will
return
only male.
NOT searches. Enter a ! at the
beginning of a field to search for a record which does not contain that
value. Enter ! by itself in a field to find records where that
field is blank or null.
FULLTEXT indexes. When
a comment field (display type="comment") has the "index" box checked,
the letter "F" appears next to it to indicate a FULLTEXT index is being
used. This is an advanced feature in MySQL for finding words
within
a long string of text. For example, if a recipe database has a
comment field named "ingredients", you may wish to let your users enter
an ingredient into a text box to search that field. A
conventional
index will not help at all in this case, as the SQL command: WHERE field_name LIKE "%user_text%" does not
benefit from indexes and the queries could be slow on very large
databases.
When a FULLTEXT index is used, Webdata Pro will automatically replace
the above command with: WHERE MATCH
(index_name)
AS ('user_text'). Not only will this find all of the
recipies
which contain "soft shell crab" in the ingredients list extremely fast,
but if you do not specify a sort order in the layout, MySQL will
automatically
return the best matches first. Ie. The first results will contain
all 3 words, then only two, and finally every record that contains any
of those words. When using the "use a single search box" option,
you will still benefit from the speed of FULLTEXT searches, but it will
default to the original sort order because Webdata Pro seperates
and queries each word individually. A FULLTEXT search will not
return a record if only part of a word is provided (searching for
"male"
will not match records on the word "female", but also "crab" will not
find "crabs"). FULLTEXT searches will not match words with less
than 3 letters, and will not match words that appear in more than 50%
of
the records. If this is not to your liking, simply uncheck the
index box for that comment field and the database will perform
non-indexed searches for text strings as usual. To convert a text or list field to FULLTEXT: Remove any index
from that field. Then go to the SQL Entry page and type:
ALTER TABLE table_name ADD FULLTEXT
field_name (field_name);
for example:
ALTER TABLE recipies ADD FULLTEXT ingredients (ingredients);
COMPLEX searches among multiple
fields:
By far the most complicated syntax is the method used to
search for a criteria #1 in one field OR criteria #2 in a different
field.
Fortunately this is not something which your casual end users will need
to do in most applications, but you may need it from time
to time. The key to searching across multiple fields is to put
the criteria inside 1[ ] as the criteria for
the first field(s), and 2[ ] for the second
field(s). You may have up to 50 bracketed sets of OR criteria.
Here is an example of a form which will find all employees who
are either Full Time or have been with the company since before
1/1/1993.
Using this method, it is also possible to group sets of AND
conditions and search for a query which will return records where
"this and this and this" OR "that and that" OR "thus and thus and
thus". For example, if I wanted to find full timers that
have been
here since before 1/1/2000 OR part timers that have been here since
before 1/1/1993 I would put a 1[ ] around every
criteria that
was part of the first set of conditions (full timers hired before
1/1/2000), and a 2[ ] around every criteria that was part of
the second
set of conditions (part timers hired before 1/1/1993):
For those of you experienced in MS Access, the above example
would be similar to filling a QBE grid like so:
Employment Status
Date of Hire
Full Time
<1/2/2000
Part Time
<1/1/1993
Notes: If you use even one set of bracketed criteria
sets, ALL
criteria in the search form should then be contained in numbered
brackets. If 1[*] exists in any search criteria,, Webdata will
ignore any critera that is not inside a numbered bracket. It
should never be necessary to use the same numbered bracket twice in the
same field. You may still use the words "AND" and "OR" within a
bracket, so to indicate that, in addition to some criteria in other
fields, I want the color to be red
or blue, I can type 1[red or blue]. Any search criteria
that
works without numbered brackets will work inside of a numbered bracket.
Building complex searches into text links: We know you
aren't going to try to teach your users to enter the syntax shown
above,
but you might want to build a text link which does the search for
them. For a simple search of all records, the syntax is: /cgi-bin/webdata_pro?_cgifunction=search&_layout=yourLayout(where
yourLayout is the name of the desired layout)
For a simple search of all records where the "color" field in the
"products" table contains the word "blue": /cgi-bin/webdata_pro?_cgifunction=search&_layout=yourLayout&products.color=blue
For a simple search of all records where the "color" field in the
"products" table contains the word blue or red, I would have typed
"blue or red"
into a search box, so the URL is: /cgi-bin/webdata_pro?_cgifunction=search&_layout=yourLayout&products.color=blue%20or%20red
Notice how the spaces in "blue or red" were replaced with %20 signs?
Spaces and special symbol characters are not allowed in a URL, so they
are replaced with a % sign, followed by the Hex value of the symbol's
ASCII code. For instance, the escaped value of a space is %20.
Now the escaped value of the left square bracket [
is %5B,
and the escaped value of the right square bracket ]
is %5D.
THEREFORE, the escaped value of 1[Full Time] is "1%5BFull%20Time%5D".
Using the tool above, find that "1[Full Time] 2[Part Time]"
converts to: 1%5BFull%20Time%5D%202%5BPart%20Time%5D
and "1[<1/1/2000] 2[<1/1/1993]" converts to:
1%5B%3C1/1/2000%5D%202%5B%3C1/1/1993%5D
So, if the fields are "employee.status" and
"employee.dateofhire", your search URL would look like this: /cgi-bin/webdata_pro?_cgifunction=search&_layout=yourLayout&employee.status= 1%5BFull%20Time%5D%202%5BPart%20Time%5D&employee.dateofhire=1%5B%3C1/1/2000%5D%202%5B%3C1/1/1993%5D
I know it looks pretty ugly, but all we're doing is escaping the
search criterias from the example above and pasting each one after &table.field=
in the search string.
Double-click Shortcuts.
On "Manage Table Configurations" double click any field
name to go to that table's "Manage Data" form.
On the "Configure Fields" page, double-click the radio button to
"Redefine Selected Field".
On the "Manage Layouts" page, double click a layout to edit it.
On the "Manage Members" page, double click a member to edit them.
On the "Configure Instant Members" page, double click an Instant Member
profile to edit it.
On the "Manage Records" page, double click a table to go to it.
MySQL Tips
Creating a new database and username from the command
line: If you are the administrator of your MySQL database,
there is a tool which is included with MySQL that makes creation of new
databases and accounts very easy. The tool is called "mysql_setpermission".
From a command line, type:
mysql_setpermission -u root
The program will prompt you for the MySQL root password. Then,
unless you need to use an existing database or username, you
should choose option "2". The program will prompt you
for a new database name, a new username, and a new password. When
it returns you to the main menu, type "0" to exit.
Creating a new
database and username using phpMyAdmin:
1. Go
to phpMyAdmin 2. Enter the
name of a new database and click "create" 3. Expand the
"mysql" database 4. Select the
icon next to the "db" database. 5. Click
"Insert new row" 6. Add these
values: Host:
localhost (unless mysql runs on a different
server from Apache,
in which case enter the mysql server name for host) Db:
[name entered in step 2] User:
[select a username] ALL
OTHERS: 'Y' except: Grant_priv:
'N' References_priv:
'N' 7. Click Save
8. Select the
icon next to the "user" database 9. Click
"Insert new row" 10.
Host: localhost (unless mysql runs on a different server from Apache,
in which case enter the mysql server name for host)
User: [name entered
for User: in step 6]
Password: [select
PASSWORD from the Function menu,
and enter a password in the Valuebox]
ALL OTHERS
'N' 11.
Click Save 12.
Click "Home" at the top of the left frame 13.
Click "Reload MySQL"
Configuring a Windows
Server
Webdata Pro requires 3 things to run: A web server, MySQL,
and Perl. All of
these things are available for Windows, but must be enabled
or loaded first.
1. The Web Server: Most versions of Windows 98/NT/2000
come with a web server called "IIS" or
"Personal Web Server". Windows XP does not come with a web server
unless you
purchase the professional version. From the "Add/Remove programs"
control panel, look for
"Internet Information Service (IIS)" or "Personal Web Server" under the
Windows Components
listing (Windows 2000) or under the "Internet Explorer" program group
(Windows 98).
Once you have enabled the web server, go to the
"Administrative Tools" control panel and
click the icon to configure "Personal Web Manager". If there is
not already a directory under
<home> named "cgi-bin" or "cgi-local", create one. Make sure to
give it Execute (script) permissions.
2. ActivePerl: Download the latest version of
"ActivePerl" from http://www.activeware.com.
If you are on an older version of Windows, you might need the Microsft
Installer as well. There
are links on the page.
Run the "setup.exe" program to install ActivePerl. Accept the
default settings, and be sure to
choose "Yes" when asked if you want ActivePerl to register Perl for
IIS.
When its all installed, restart the machine, then put the
"probe.pl" script which came with the
Webdata Pro download into the cgi-bin and browse to it
(http://localhost/cgi-bin/probe.pl).
If all goes well, you should see "Your operating system is...."
followed by a lot of information
about your system.
If it says it cannot be found, go back and make sure that the
cgi-bin
is properly defined in the Personal Web Server control panel.
If it dumps the Perl script
to the screen (begins with #!/usr/bin/perl) then ActivePerl
failed to register .pl with IIS and
you will have to do it manually. Follow these steps:
1.Click on Start, Run, regedit.exe
2.Expand HKEY_LOCAL_MACHINE
3.Expand System
4.Expand CurrentControlSet
5.Expand Services
6.Expand W3Svc
7.Expand Parameters
8.Expand Script Map
9.Right click within the right pane/frame (of Script
Map) and select New, string value.
10.Enter .pl
11.Modify .pl and enter the full path to
the perl.exe program along with "%s %s"
example:
e:\Perl5\bin\perl.exe %s %s
12.Create additional entries for ".cgi" and ".plx"
13.Exit Regedit.
14.If MS PWS is running then, then start
and stop http services.
Restart the computer and browse to probe.pl again. If it still
fails to run, contact
your favorite Windows System expert for help getting the cgi-bin set up
with Perl.
You cannot proceed until this is working.
3. MySQL: The Windows version of MySQL can be downloaded
from
http://www.mysql.com. After you install it, go to the
c:\mysql\bin directory
and double click on "mysqld-opt". A DOS window should
open for a few
seconds to a minute and then close.
Revision History
Version
Date
Comments
1.63
2/24/04
Fix - Cookie wasn't carrying
over to $include, so restricted layouts wouldn't display.
Feature - replace text within layouts.
1.62a
1/16/04
Fix - Retrieve Orders has
been improved.
Feature - Vcode added to checkout screen
Fix - NoResultsPage changed back to a redirect, not an insert.
Fix - problems with Cancel on Modify screen closing primary window.
1.61
10/6/03
Feature: MS Excel added to
Export options list.
1.6a
9/29/03
Bug fix.
1.6
9/29/03
To upgrade
from version 1.52 or earlier:
First click "manage data" and "backup the database". Since this upgrade
involves structural changes to the _preferences table we recommend
saving
a backup before proceeding.
Next upload the new "_images" directory to your "uploads" directory.
Upload "wdpro.pm" to the" cgi-bin" and log in
as admin again.
Then return to the "backup the database" page. Click "Browse"
and select "upgrade_to_1.6.sql", then click "Restore". Click "OK" at
the warning prompt.
SECURITY FIX -
Upgrading is highly recommended. A security hole was discovered in
versions 1.52 and below. The hack allows members to view and modify
values in the database other than specified in the member's privileges.
FEATURE - moved the Member field labels for user1-user10 to the member
profile,
allowing
a different set of labels for each member or member-group.
FEATURE - Unlimited instant member groups - now its own control page
linked
from "Manage Members"
FEATURE - Bulk Email, admin may send a message to thousands of members
at
once. Optionally, visitors can send an e-mail to all the results of a
search.
FEATURE - Auto-expire and auto-renew members.
Fix - _cgifunction resets after using "mail me my password" so user can
submit
without reloading the form.
Fix - No more double submitted orders on final checkout using "Save
data
on server"
FEATURE - A new numbering system for the checkout ID does not increment
for
incomplete orders, giving the client a sequential list to work with.
FEATURE - Up and Down arrows on the SQL screen make it easy to recall
previous
commands, even after hitting "Clear".
FEATURE - "Skip First Field" option on Import Data screen. If your
source
data does not include a blank column for the auto-number field which
Webdata
creates as the default first field, you can check this box to align
your
data with the second field and after.
FEATURE - Random Sorting. Offer a different sequence every time
FEATURE - Expanding/cascading folders formatted reports.
Fix - Better parentheses encapsulating in complex mixed "And" and "Or"
SQL
statements.
Fix - Trapped for null zip code coordinates. Missing zip codes were
throwing
off the searches.
FEATURE - $user_data include form values in templates
Fix - When using templates, Modify was erasing upload file URLs in some
cases
Fix - More tightly renames and deletes directory names in uploads when
records,
tables, and fields are modified or deleted.
Fix - Uses LAST_INSERT_ID() to name record directory according to the
actual
autocount number, which is not always MAX()+1
FEATURE - "Go Back" link below images when previewed in maintenance
screen,
which opens with no toolbar.
Fix - Date values in Maintenance page were not displaying correctly.
FEATURE - Pop-up calendar next to date fields
Fix - Pop-up window for combo box lists > 500 is now sorted by
LabelA,
LabelB, Value.
FEATURE - Double-click shortcut added to Manage tables, members, and
layouts
screens. DblClick any field in "Manage Tables" to go to that table's
"Manage
Data" page. DblClick any field's radio button to "Redefine Selected
Field".
FEATURE - Swedish Language added to layout search navigation.
FEATURE - Pop-up list options for Member's USER# customized Member
fields.
FEATURE - On "Manage Members" page, group leaders appear first in Red,
sorted
by number of members grouped to each.
FEATURE - $select now uses BORDER, COLOR, and LABELS to draw a table
similarly
to $query
FEATURE - search/modify screen can now be sorted by column labels.
FEATURE - Bare-Bones mode: If neither "Include Form View Button" nor
any
of the navigation checkboxes are selected, the search results will not
include
the <html>,<head>,<body> tags nor the navigation
form,
scripts, and table. This will make it much cleaner when including the
search
results into another page.
FEATURE - Add to 2 or more tables from 1 form. Just include all the
table
names in the _tableName field, seperated by a comma, and make sure your
relationships
are defined.
FEATURE - Grouped member fields now disable when a group-to value is
selected
to avoid confusion.
1.52j,k,L,m
3/5/03
Feature - Added $member, $ENV, and $include
template tags to virtually every template screen.
Feature - Modification e-mail now includes the member ID that made the
change.
Fix - "upgrade from 2.x" was causing problems by adding the
_owner index at the wrong time.
Fix - 1.52i had problems with "Go to page..." navigation and
order links.
Fix - problem modifying when upload field was a required field.
Fix - $order link wasn't working properly in 1.52j
Fix - Attachment delete checkbox was returning an error in some
situations. Fixed in 1.52L
Fix - version 1.52L was not sending "modification" e-mail notifications.
1.52h,i
2/5/03
Feature - Welcome message to Instant Members. A box
appears on the preference page below "Instant Member" and "Instant
Member 2"
to define a mail message sent to the new member upon sign-in. Keywords
include $email, $password, $subject[] and $from[] .
Feature - $select and $escapeselect added to member homepage template
and modify record template.
Feature - $hitcount returns the number of times a record exists in the
_viewlog, enabled in the "Search Results template", "Form View
template", and "Modify Record" template.
Fix - Adapted Authorize Net schema to use SIM method, as WebLink is
being disabled. If a valid transaction ID is saved in the cart
preferences, an MD5 encrypted "fingerprint" is generated when the final
checkout page is submitted.
Fix - renamed "_returnFunction" and "_pageNum" with leading
underscores for better identification as control fields and to filter
them from the search logs, related bug fixed in 1.52i.
Fix - In some cases certain $tag[data] tags were not interpreting right
when two tags appeared on the same line.
Fix - Removed "Prev" and "Next" from 'view log files' page when not
applicable.
Fix - Image submit buttons post "name.x" and "name.y" values. These
have been filtered from the search logs.
Fix - Added user-defned FONT tag into table header row in default
search results.
Fix - If no label is used in a table-driven list field, list sorts by
field value
1.52g
1/31/03
Feature - If zip distance searching is used, and no
default sort order is specified, results will sort according to
distance from user's home zip.
Fix - zip searches are now much faster.
Fix - searches with member fields were not advancing beyond
page 1 because of the _escapeval_ fields.
1.52c,d,e,f
1/27/03
Fix - Doublequotes in criteria would not work with "Next
Page" buttons
Fix - search/modify was not refreshing query after modifying a record.
Fix - upload of some files was creating an error when the thumbnail
feature was enabled.
Fix - $include was not working on some template boxes.
Fix - Escaping search vals to fix Doublequotes problem above broke
"Next Page" when "_allSearch" was used.
1.52
(1.52a,b)
1/13/03
Feature - Rename Table (although not yet cascading new
table name to layouts)
Feature - Log user searches, Log form views
Feature - Dynamic Combo box, list values derived from tables without
necessarily defining a relationship
Feature - Custom Image URLs for 'View Cart', 'Check Out', etc.
Feature - 4th level of sorting added
Feature - $select allows user to enter any SQL SELECT statement without
the pre-appended criteria of $query
Feature - $escapeselect retuns an escaped value of $select
Feature - $order link allows "sort by" links in templates
Feature - Define a custom URL for "no results were found"
Feature - $ENV shows environment variables
Feature - $include inserts any URL page into the template
Feature - $dateCreated[table]
Feature - Layout field lists now have "move up", "move down", and
"delete field" buttons
Feature - E-mail sent to admin when new member is added
Fix - ownership bug related to case differences in login username
Fix - Checkout no longer shows incomplete orders
Fix - View orders screen is formatted better
Fix - Shopping cart now works across all layouts.
Fix - Cart header, footer, and instructions had problems displaying
html tags.
Fix - _owner is indexed for faster joins
Fix - .tab added as permissible import file type
Fix - uses REPLACE instead of INSERT during import, reduces
errors if a duplicate key field exists
Fix - auto-image display in default layout did not work with capital
letter extensions
Fix - zip code searches now work on member profile zip codes
Fix - IF statements are working better
Fix - Return to member home page links added to manage data
pages
Fix - combo box values now appear in ascending order by first label
value
Fix - Prompts before added _owner and _timestamp to existing tables
Fix - relationship table fields are now 100 characters
Fix - customer data in cart e-mail
Fix - alignment of total values in cart e-mail
Fix - searchall was not escaping apostrophes properly
Fix - member export was not properly limited
Fix - zip distance now handles 9 digit zip codes
Fix - 2 layouts on the same SSI page no longer conflict form view
buttons
1.51a,b
5/15/02
Feature - Member Homepage templage
Feature - 2nd Instant Member group
Feature - $escapemember[] template tag
Fix - New WorldPay "Junior" Cart Syntax
Fix - $if supports "eq" and "ne" operators
Fix - 1.51b bug fix with "eq" and "ne" operators
1.5
4/24/02
Feature - Zip Code Distance Searching
1.42
4/17/02
Fix - super member may retrieve orders
Fix - order confirmation title bar in cart color
Fix - default "empty cart" now matches other default buttons
Fix - checks for reserved words when importing tables and upgrading
from Webdata 2.x
Fix - "view" button had bug if layout name contained spaces
Fix - member e-mail added to "owned by" list in maintenance
page
Fix - $if statements work in member maintenance template
Fix - $member works in $if statements in all layouts
Fix - more robust handling of html tags in member templates.
Feature - images for "view cart, check out, empty cart"
Feature - OUTER "OR", a method of defining sets of "or" conditions
across multiple fields.
Feature - images for "next page" and "previous page"
1.4e
3/19/02
Enhancement - Search results templates are rendered faster
1.4d
3/15/02
Fix - very long query strings were causing "next page" to
fail in IE6.
1.4c
3/11/02
Fix - $query[] was returning errors on count(*)
1.4a,b
2/25/02
Fix - instant members with "limit to 1 record" could not
create initial record.
Feature - Replaced "Modify" with "Submit" when creating first record
using "limit to 1 record"
Fix - Thank you templates were not working on "modify".
1.4
2/20/02
Feature - FULLTEXT searches added for comment fields
Feature - Thank you templates
Feature - disallows duplicate entries, box in preferences for timer
delay
Feature - Feature - sizes for member profile boxes
Feature - selectall option for $query
Feature - Anonymous record entries.
Feature - added "ISNULL" or "!" to search for empty values
Feature - !text to search for fields that do not contain a certain
string or value.
Fix - prompt disallows required words in table and field names.
Fix - if somehow there was no primary key, could not create
one.
Fix - $if was inserting spaces which kept it from returning
false on blank fields
Fix - "between x and y" now works for admin date_added searches
Fix - $query[] now handles all fields in form view regardless of
initial report fields.
Fix - Instant Member was not loading group leader's default
template
Fix - % signs are now escaped in searches
Fix - Admin sees all records even if "Limit member searches
to only their own records?" is checked.
Fix - &do(), which processes most sql statements, now escapes angle
brackets when printing in debug mode.
Fix - Combo boxes from related tables are not practical when the select
list will contain thousands
of records. A textbox is used unless the
list has less than 500 records.
Fix - Decimal numbers are aligned in
1.3h
11/7/01
fix: table template data was being lost when member
profile templates were used
fix: instant members now see the member profile template of
the instant member group leader
fix: date fields were not working when their $field tag was
omitted from a table template.
1.3g
10/26/01
fix: another fix to the URL to link algorythm.
1.3f
10/12/01
fix: url fix in 1.3d caused problems with automatic image
display.
1.3a,c,d
10/2-5/01
Minor bug fixes:
urls were not always converting to links
$if was not returning false on empty fields
$format was sometimes returning 0.00 on search results template.
Maintenance template was substituting " for " signs
1.3
9/20/01
Member Profile Template - allowing admin to customize
the member profile page and optionally hide member fields
Admin can now define _owner when adding a record.
Improvements to group header template
bug fixes: date range searches were not working, required fields were
not getting error messages, option list for replace did not show all
fields,
1.2b
9/10/01
Bug fix, newlines were being appended to comment fields
when modifying.
1.2
9/8/01
Numerous minor bug fixed related to group header, $if
conditions,
and automaticaly generated relationships.
1.1e
7/5/01
Discovered unusual Perl compiler hangup and reworked
necessary lines.
Added <BR> substitution for newline characters.
1.1d
7/2/01
Bug Fix - Date Added was not working with "limit to 1
record" mode.
1.1c
6/28/01
Added Inventory Control to shopping cart
Added $format tag for displaying monetary values
Added Export Member Data
1.1b
6/21/01
Added shipping price by country table.
Fixed problem with apostrophes in primary key in IE
$if removes leading spaces before evaluating blanks.
$member tags to display current user's info.
1.1a
6/6/01
Added Instant Member Referer check and numerous
minor fixes to the shopping cart related to European users.
1.1
6/1/01
Fixed extra spaces at top of select lists
E-mail confirmation to customer after purchase
Upgrade feature converts $data[#] to $data[table.field]
Added backup and restore feature
Added "Replace Values" feature
Added "Search All Fields" feature
Added Default Country option to cart preferences
1.0b,c
5/22/01
Minor bug fixes to shopping cart
1.0a
5/16/01
$addbutton was not functioning properly in form templates.
1.0
5/15/01
Initial release
Credits
Webdata Pro was written entirely by Webteacher Software,
LLC
in Fremont and Irvine, CA.
The lead developer was Robert Young. The interface was designed by
Susan Clifton.
The primary development machine was a Pentium 233
with RedHat Linux 6.2, Apache 1.3, and Perl 5.6.0. The primary editor
was Xemacs 21.1.
The primary test database was MySQL. 3.22.32. This tool would not
be possible if it were not for
the DBI module by Tim Bunce, J. Douglas Dunlop and others, the authors
of the various DBD
modules, the CGI module by Lincoln Stein, and of course, Larry Wall.